We have moved to thamjiak.com! Please use the search box there to find your current post ->

Tham Jiak: What's Cooking
Tham Jiak means in some way "love to eat" in Hokkien. I am a Malaysian Hokkien and truly love to eat.
Showing posts with label What's Cooking. Show all posts

Sunday, July 02, 2006

Going Thai

It has been so long since I contribute to the weekend herb blogging at Kalyn’s (I got to her blog and found her blogging on the same herb this week, how coincidence!). This time I decide to add in my entry on Chinese parsley (pictured above as garnish). This herb surprisingly has various names referring to it, where last year, without the world of blogging to expose me, I would be totally lost. It is also known as coriander leaves, cilantro and dhania in other parts of the world. It was once pretty confusing when I see it mention in foreign recipes and I had to research up on it. As for its uses, it is usually used for garnish as it will loose its flavours quickly with heat.

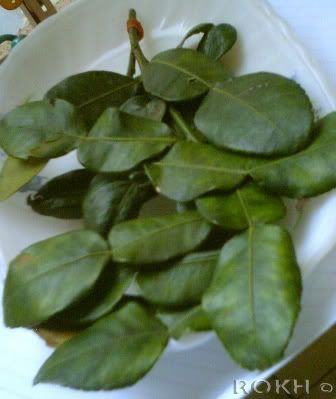
But this time, as per recipe I would be cooking it slightly at the end and then garnish it with more parsley. This dish also features a lot on the limau purut (kaffir lime leaves) which I had blog before on of those long-time-ago herb blogging. This time I am making a dish from the Thai cuisine. Thai is one of my favourite Asian cuisines, apart from Chinese and Indian, and also not to mention Vietnam. Thai is famous for its sweet, sour and spicy cuisine, complex in taste yet light on the palate.

So since these are my last few days of freedom, and usually being alone during the day, I decided to whip up a light lunch. Flipping through the recipes, I was drawn towards making my very own

Pad Thai

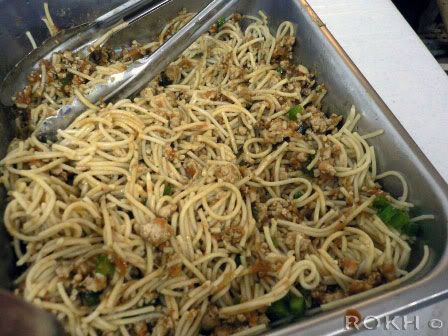
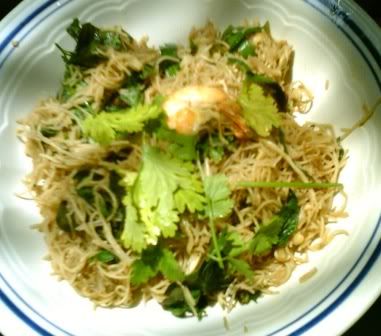
I remembered having this dish before but I cannot recall where. Nevertheless, I know it would be good, as reading the ingredients made my mouth water. This dish can be chow (fried) with other meats such as chicken or beef but this time I am using prawns, since Tesco is having a huge sale on prawns, and it seem to be more authentic this way. Then of course there must be the fish sauce, which is the main flavouring agent in this dish. You can also substitute it with soy sauce, if you don’t have it. Oh ya, I wanted to get glass noodles for this, but I cannot seem to find it in Tesco, thus I bought brown rice vermicelli instead, just for the sake of nutrition, hence the darker looking Pad Thai. Since this recipe have many variations, and you can add many ingredients or omit them, I would list down the alternatives too and do take note everything is in estimation, after all, this is done with Asian cooking style (if you don’t know what style, it is the dump, fry and taste style). Enjoy.

200g of noodles (rice vermicelli or glass noodle)
12-15 Prawns (I forgot how much I bought, but lets say two big fistfuls)
Bunch of mushrooms (sliced thinly)

1 fistful of Chinese parsley (stems removed)
1 fistful of kaffir lime leaves (roughly teared up)
1 bunch of Chinese chives or scallions (green parts only, cut up 1 inch long)
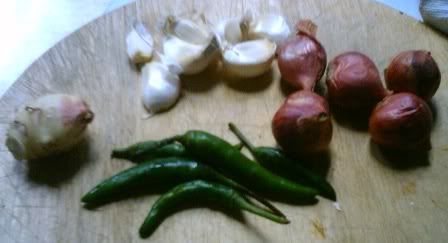
3-5 Thai bird chillies
5 shallots
5 cloves of garlic
1 20inch cube of fresh ginger
(all above peeled and slice then grind)

Fish sauce to taste
3 tbps of oyster sauce
1 lime (zest and juice)
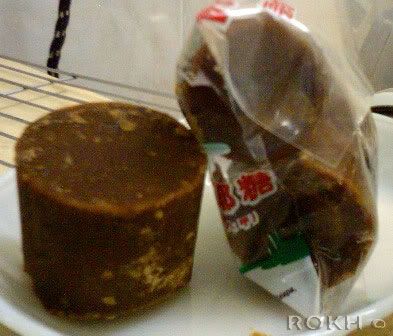
1 Tbsp tamarind (soak in some water)
Sugar to taste
Some broth or water
Oil

Garnish:
½ cup unsalted peanuts
1 fistful of chopped parsley (stems removed)

Variations (substitute or add in):
1 boneless chicken breast, sliced thinly, marinated with fish sauce for bout half hour
2 blocks of firm tofu, sliced thinly (I should have added this, I love tofu)
1 egg
Pepper to taste
Fistful of bean sprouts
Banana flower

First soak the noodles in warm water until soften, then drain
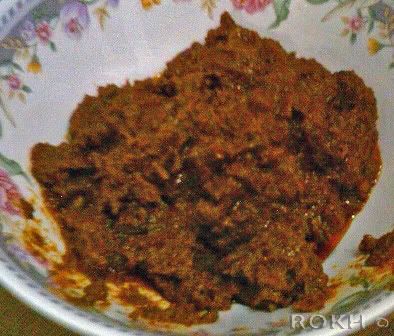
Grind up the spices – chillies, shallots, garlic and ginger
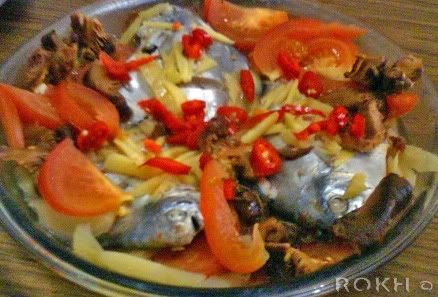
Remove the parts of the prawns that you do not like, I left on the shell and tail plus half the head, legs removed of course.
Then heat up the wok in about 3 tablespoons of oil.
Throw in you paste and fry briskly, till the aroma is all over your kitchen.
Then add in the prawns and fry quickly till slightly red
Add in mushrooms, give a quick fry as it wilt quickly
Add fish sauce to taste
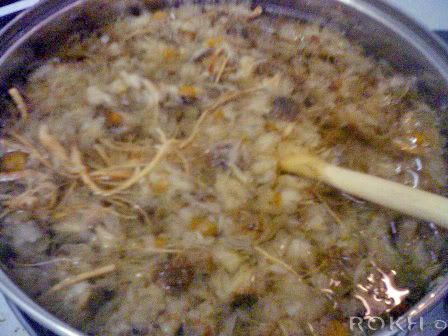
Now add in the drained noodles, fry until slightly limp (careful that it does not stick to your wok but still the heat must be high, else it will turn watery)
If using egg, push aside the noodle and crack in an egg, scramble till cook and then fold into the noodles
Then add in fish sauce, sugar and pepper to taste and tamarind plus its water
Then fry some more till a little dry, then lower the heat a little
Add in oyster sauce and stir till combine
Add in the scallions or chives, lime leaves and parsley, stir fry a little more
Off the fire, dish up and serve, garnish with chopped peanuts and more parsley and a lime wedge if needed.

Serves 3-4 people for lunch

Friday, June 09, 2006

Exploring My Origin: Bak Chang

I am back in my hometown for the weekdays and I had gotten myself busy with, yes you guess it, cooking! Well, I know I’m pretty late but since I only got back last two days, I pestered my Lai Ma (nanny) into making bak chang with me.

Bak chang is actually Chinese meat dumpling that is usually made during the Duan Wu festival. As all Chinese festivals, this one too has a legend behind it. This day is to honor Qu Yuan, a wise minister in China who was greatly loved by common people. Due to despair of the government and the defeat of his country, he drowned himself in a river. After that people searched for him in the river with long boats, beating drums as they went and throwing dumplings into the river to feed the fishes so that they won’t eat his body. After that, on this day, fifth day of the fifth month in the lunar calendar, it is then customary to enjoy bak chang (commonly known as zongzi) in memorial. Dumplings are made and enjoyed while dragon boat races are also held alongside, in commemoration of the initial search.

Since young, I had always enjoyed these dumplings, thought it is only quite recently that I learned of the meaning behind it. There are many types of chang (dumpling) made here in Malaysia. The usual ones that I know of is bak chang (which I made this time), which is savoury, and the kan sui chong, which is the sweet type, made plain with lye water and to dip with kaya or coconut caramel. These two are my usual favourites. Bak chang comes in two types, the dark or the white ones. Foodcrazee had talked bout the white ones here. The usual ones that I always had were the dark ones, which is the one I made this time. Bak chang usually have sam chang bak (pork belly), Chinese mushrooms, dried shrimps, either pak mei tau or lok tau (split green peas), salty duck egg yolk and of course, my personal favourite, fong lut (chesnuts).

The process was tedious, as I had expected. But I was adamant to learn and make it; else the tradition and method will be lost. After all, making this dumpling seems like a very good addition to my ‘exploring my origin’ project.

When I got back, I was only half expecting my Lai Ma to make bak chang with me, I had requested since last week, as she is the type who needs to be in the mood to do something. Nowadays, it is up to whether she feels like it or not, or she is tired or not. This time I got lucky, she asked me bout it and then took everything out to prepare. She said she made some before hand and there are leftovers ingredients. The only thing that I needed to do was to walk 5 minutes to the local tim chai (mini store) nearby and get some beans and extra bamboo leaves for wrapping.

So far there are many variations in making this bak chang, but to me my Lai Ma’s bak changbak chang was out and ready to be devour! All I can say is, my cravings had been answered.


Bak Chang

Alright, the whole process is pretty tedious and seemingly complicated, but don’t feel daunted, take up the challenge and make it. As for me, my chang is much simpler, with less ingredient but nevertheless yummy. I also left out the usual salted duck egg yolks, because the selfish me do not like it.

For the recipe, I break down to few parts for easier preparation. Most of the ingredients, especially the spices and flavourings are all in estimation as, I have said, we Chinese cooked by whim, with fingers dipping in and tasting as we go. It is always a splash of this and a dash of that and some jiggling of this and some spoonfuls of that. My Lai Ma said, cooking by taste is one of Chinese secrets to good cooking, as all ingredients we use differ, our own tastes of what is salty and sweet also differ, therefore we cooks know best to tweak to our the situation and our liking.

As for the wrapping, I wish I could be a better artist to illustrate it, but oh well if you still do not understand, you can head on to Teckie to see the video of her mum wrapping the bak chang, she had also written a comprehensive detail of the preparation. Be careful bout the wrapping as either if wrongly wrapped or too loosely tied, it will leak and come unwrap, resulting in a mess that cannot be salvage. We lost one of it (must be the one I wrapped, he-he.

Ingredients:
1 kg glutinous rice
800g – 1 kg pork
200g of pak mei tau (not too sure but I guess it is soy bean)
200g (35-40) fong lut (chestnuts) (depending how many you want to put in your dumpling, we have two for each)
8-10 Chinese dried mushrooms (or 16-20 small ones)
Handful of har mai (dried shrimps)
Handful of minced garlic

Additional fillings (I did not add):
Salted duck egg yolk
Hou see (dried oyster)
Lap cheong (dried Chinese sausage)

20 bamboo leaves
8-10 ham choong chou (literally the dumpling weed plant. You can use any string here)

Marinate for pork (in estimation):
2-3 tbsp of five spice powder
Pinch of ajinomoto (I wouldn’t want this but my Lai Ma insists)
Pinches of salt
2-3 tbsp of white pepper
3-4 tbsp of oyster sauce
2-3 tbsp of dark sauce

For the frying the rice (in estimation):
3-4 tbsp of dark sauce
4-5 tbsp of soy sauce (or to taste)
6-8 tbsp of five spice powder
3-4 tbsp of pepper
5-6 tbsp of oyster sauce
Pinches of ajinomoto
Pinches of salt

For frying the fillings (in estimation):
2-3 tbsp of five spice powder
2-3 tbsp of oyster sauce
2 tbsp of pepper
3-4 tbsp of soy sauce

Method:
Day before (or in the morning):
Soak rice with water for at least 6 hrs and up to one day.
Cube the pork and marinate for 8 hrs or overnight

Few hours before cooking and wrapping:
Soak bamboo leaves in water till soft. Then gently wash with running water, wiping with cloth. Stack it up face down in a basin, and then submerge in water until use.
Boil the chestnuts and beans till half cooked.
Soak the dried mushrooms in hot water till soften, then remove stem and halved it (for big ones)
Clean the har mai a few times, running through with water
Drain the soaked glutinous rice.

Cooking the rice:
Heat up 3-4 tbsp of oil in a wok.
Throw in garlic and fried for a minute.
Then add in the glutinous rice and stir fried.
Slowly add in all the frying ingredients, tasting as you go.
Lastly, add in the soy bean, then fry and mix evenly.
Add spices if needed.

Cooking the fillings:
Heat 3 tbsp of oil in wok.
Then add in garlic and stir fry for a minute.
Add in har mai, fong lut and mushrooms.
Fried for few minutes and mix well.
As usual, add in all the fillings spices one by one and fry till evenly mix.
Add in the marinated pork and continue stir fry.
Add in water (bout quarter bowl).
Fry till dry.

For wrapping:
Gather 5 strings together and fold it half, then tie a not to form a bundle
Then prepare a place to wrap, something like this:

Place together ingredients and leaves below it, along with spoon.

Take two leaves and overlap on each other in opposite sides, slightly slanted.
Twist in the middle and turn to shape a cone.
First line the bottom and sides with the rice and bean mix.
Then add in the fillings in the middle: ½ pork, 2 fong lut, 3 har mai and 1 mushroom
Then top loosely with rice.
Turn it upward to close up. Pull it down slightly.
Then turn in and fold the sides.
Fold the top leaves together, then turn down the side.
Now its in a triangle shape.
Tie it with ham choong chou, around the dumpling two times then knot it firmly.

Final cooking:
Put in all the tied dumplings into a huge pot of boiling water, submerged totally in the water.
Boil it for 4-5 hrs, topping up with boiling water every hour or so.
Then take out and hang it to dry.
Peel open leaves and devour!

Make 16-20 big dumplings
(It can keep for few days or few weeks in the refrigerator)

Wednesday, June 07, 2006

MADeleines

I am MAD. Well, disappointed mainly. I had attempted my hands at making madeleines but it failed. These madeleines tasted like, well, just mini butter cakes. Besides, it was kind of too eggy to my liking, I suspected the eggs I used were not fresh enough. And of course, the mould that I use was not the madeleines mould, I just used the mini tart mould that I happen to chance upon while out with my dad and bought it along with a hand sifter (my dad pays, I’m unemployed and broke, he-he). The results are not up to my expectation, as this recipe was a hit out there with the KC forum members, so I am hoping it would be some great pop-in-the-mouth madeleines. Oh well, the problem surely lies with me, I just have to find out where (besides the not-so-fresh-eggs and the not-the-right-mould). Maybe I should try some other fail-proof Madeleine recipes out there. Any suggestions?

Friday, June 02, 2006

Self-employed in the Kitchen

J had started work today, leaving me this unemployed (starting work in July) girl alone. So I decided to be self-employed in the kitchen instead. Before this, besides hunting for job, we had been enjoying life; hence you see my lack of cooking/baking and more of scouring for food. Now it is time for me to fire back up my culinary skills.

My internet was down because we did not pay the phone bill. Yea, shame on me, but it just somehow slipped my mind. So I had no chance to surf around for recipes. That’s a habit of mine; looking through foodblogs in search of some inspiring recipes despite all these while I had been piling up on it.

So today with no internet, I finally look through my to-do list. It amazes me how much recipes I had saved up, with the sincere heart and hunger to make them. I was attracted by many recipes (well it is love at second sight since I had first saved them here), but the thing is, I do not have lots of essential ingredients in my pantry right now. For instance, milk or yoghurt or buttermilk or brown sugar is out. That practically cancels out most of the dessert recipes. I’m feeling sugar high right now, so I am just looking through this section. I chance upon this recip, from the baker which I had saved in my to-do list for as long as I couldn’t remember. LOL.

Well, this recipe took my attention the second time because it is flourless and butter-less! Now this is what I call a dessert for the weight watchers. Oh yes, and it’s a cookie recipe, which the baker decides would fare much better as cupcakes. So I decided to make these mini cupcakes. boy, was it good! It was like the heaven for chocolate lovers. It is crunchy at the top and thick and gooey in the middle. The nuts lend a good crunch to the entire cake texture. Now you chocolate lovers out there, who need a fix but want to watch the waistline, go make a batch yourselves. Due to the resulting look of the cakes, I decide to name it


Mini Molten Chocolate Lava Cakes

The recipe is fairly easy. Reading the instructions I was worried at first how it would come together with just two egg whites as the liquid ingredient, but surprisingly it binds well, not too sticky to handle and the ‘dough’ taste yummy! (Yes I am a bad habit cook that loves to taste things that she cooks). Some additional steps that I added was, first toasting the walnuts for better taste and then sifting the sugar and cocoa for lighter and more uniform batter. Before baking it in my muffin pan, I cut out the baking paper to roughly line the holes because with all the sugar in the dough, it is bound to stick like madness, and I am thankful I did this step, as it helps tremendously in taking out the mini cakes with the shape still intact. I think if you have cupcake cases, it is a good time to use them here. Besides, I had split the recipe in half, because I have so little to feed and I am worried I might finish off the whole batch! Oh and I feel that the sugar amount can be further reduce by ¼ and it would be perfect, more chocolatey and less sweet, the way I would really like it.

6 tbps unsweetened Dutch-process cocoa powder
1 1/4 cups confectioners’ sugar
pinch of salt

1/2 tbps vanilla
2 large egg whites

1 cups walnuts (toasted at 200 for 5 minutes then coarsely chopped)

Preheat oven to 350F/180C
Sift together cocoa powder, confectioners sugar, and salt in a bowl
Combine the liquids, vanilla and egg whites in a bowl
Slowly add the liquids into the dry mixture, beating at low speed with an electric mixer
Then beat the batter at medium speed till glossy
Stir in the walnuts
Line the muffin pan with baking papers/cups
Spoon about two heaped tablespoon of batter into the cup
Bake in oven for 20 minutes, till it looks like molten lava

Makes 6 mini cakes

Saturday, May 27, 2006

Happy Birthday KC!

KC is someone I might say I get to know due to fate. When I first came to KL to study, I came with a 1984, and then we bunked in a Convent senior from basketball team, temporary until we find a place to settle on. Then, KC was my senior’s boyfriend, therefore we get to know each other. From there, after shifting, we sort of keep in contact loosely until I shift over here to our place now, he so happen to have broke up, needed a place to shift and voila, he became our housemate once again.

As a friend, KC is amazing. He will do anything at all for his friends, always there whenever any of us needed help. He took care of me and my fellow 1984 housemate like sisters, protective and loving. We three in the house had once even named ourselves family.

Well, last monday was our dear KC birthday, I had decided to bake him a cake, although I know he does not really like one, but well, what’s a birthday without a cake. So, as I had put it at the weekly drools for so long, I decided to make Swee San’s

Carrot Cake with Cream Cheese Frosting

I made a few changes due to the unavailability of some stuff, and also due to a hunch to make things come together after certain changes. Ah, you bakers out there would understand.

At first look of the recipe, I had decided that the amount of sugar is too much, so I cut down quite an amount, and besides, we could not get white sugar in Tesco, imagine that, so we bought more of the brown sugar. I warn that even my amount of sugar is too sweet to my liking. Cut down more if you don’t want to have diabetes. Since having more brown sugar than white (in oppose to original recipe), I worry it would be too wet, thus I mixed all-purpose flour to the cake flour, in hope to make it drier, tell me if I’m wrong. Then, as Swee say, the corn flour addition is to make the cake fluffier and softer; I’m getting texture crazy here. I had also change the cream cheese frosting bit, since I don’t have enough butter, I added more cheese, partly also because I love cheese, so I want it to be more cheesy.

Anyhow, a few flops happened. First after baking at designated time and the toothpick came out clean in the middle. I took it out. Once cool, I remove from pan and found the sides all sticky and gooey and superbly sweet. All the sugar somehow formed a candy there. So I cut the sides all off and made a mess, with craters here and there. One lesson learnt: ONLY cut the cake once it is completely cooled! Then another mistake came with my impatience. Once the cake is semi-cooled, I attempted to frost the cake, partly because I’m impatient and partly it is late and I just want to get it done with. That is when disaster strikes. The frosting started melting as I starting spreading it. It became too hard to handle, steaming down the side. Second lesson learnt, ha-ha. I stopped at once, salvage what I can back to the rest of the frosting and chuck it into the fridge. After chilling few hours (yes I have yet to sleep), I frosted it with more luck, but sadly found the frosting with residue of icing sugar. Sigh; there goes my first cake frosting.

Ingredients
1 cup vegetable oil
500g brown sugar
200g coarse sugar
3 eggs

3 cups sliced carrots (2 large or 6 medium)
1 ½ cup coarsely chopped/bashed walnuts (roasted in 200C for 10minutes)

Sift:
1 cup all-purpose flour
1 1/2 cups (375g) cake flour minus 1tbsp
1tbsp corn flour
2 tsp baking powder
1/2 teaspoon bicarbonate of soda
1 teaspoons mixed spice

Method:
Preheat oven to 180-190C
Grease deep 23cm (9 inch) round loose-based cake pan (line base with baking paper if you do not have loose-base one)
Beat oil, sugar and eggs until thick and creamy
Transfer mixture to large bowl
Stir in carrot and chopped walnuts
Then mix in sifted dry ingredients little by little till incorporate
Pour mixture into prepared pan, bake in moderate oven about 1 1/4 hours
Cover cake loosely with foil halfway through cooking
Stand cake 5 minutes; turn onto wire rack to cool.
Spread with cream cheese frosting and decorate as desired.

Cream cheese frosting:
25 g butter
120g cream cheese, softened
250g icing sugar mixture

Method:
Beat butter and cream cheese until light and fluffy
Gradually beat in icing sugar bit by bit

Friday, May 05, 2006

Satisfying a Craving

I wanted to post this up for the Jihva by Mahanandi, but I was off to Taiping, having fun and forgotten about it. But since this is a really cooling and refreshing dessert, that I sort of made up, with inspiration from sai mai lou that we have here in Malaysia, I decided to share it anyway.

Sai mai lou is actually sort of like ais kacang in Malaysia. Ais kacang is actually shaved ice swirled with sweet syrup (sometimes Gula Melaka) and evaporated milk then topped with various stuff, like mini jellies, red beans, peanuts, sweet corn and lots more. As for sai mai lou, the similarity is that it also has shaved ice, swirled with evaporated milk and fruit juice then topped with the cubed fruits and sago pearls. Of all the varieties, I always like the Mango sai mai lou best, as it is rich in taste and goes really well with the light milky ice and sago. The best one I ever had, which was the first, that got me hooked to sai mai lou is the one at Petaling Street (Malaysia's Chinatown). I’m not sure of the location but I remember is at one end of the street opposite a bank, and with a bookstore nearby. This roadside stall is manned by a lady, which has all sorts of sai mai lou, from honeydew, strawberries to of course, Mango.

As for my own version, I was craving for something alike, but of course I have to do away with the shaved ice, which needs a machine-like-device to shave a huge block of ice, and poor me as my blender could not take ice (yea a cheap one), and so came about this dessert that I call

Mango Sago Lou

1 mango:
1 cup cubed mangoes
1 cup chopped mangoes

1 cup milk
¼ cup sago pearls

Method:
Boil the sago pearls to translucent (a tip is to only put in the sago pearls when the water is boiling hot, in order to get clear looking sago in the end, stir once a while as the sago will stick to the bottom)
Once done, pour the sago into a colander and quickly run through with cold water to stop the cooking.
Scoop the sago into a bowl
Blend the chopped mango and milk together
Pour onto the sago, and then top with cubed mangoes
Chill for about an hour or a while in the freezer (like the lazy me) then devour cold

Satisfies 1

Note: I forgot to mention that my mangoes was really sweet and if yours are not so, do add some syrup (sugar water) to taste. Bon apetit!

Thursday, April 13, 2006

A Cheesy Reward

Yesterday was the day I’m supposed to stay at home and hit the books. My final exam is just around the corner, and I have yet to start on my revision. It took me whole day to really start firing up. Once a while I would sneak into the net and surf the food-blogosphere, to torture myself with all the yummy food out there. I stumbled upon a recipe at Jennifer’s blog, Fallen Souffle, which immediately made me think of J. Yes, you got it right, to think of J, it has to be of cheese and something cake-like. His secret vice. It was Jennifer’s quick and easy Mini Cream Cheese Tarts that had caught my attention.

J and I were both “studying” at our own home, and only to meet at night. Besides the though of rewarding him for his hard work, I also remembered promising him a cake since it had been a long time he had indulged. We nearly went to a local cake shop few weeks ago, but it was too late and the shop is closed for the night. Thus I promised to make for him next time. So here is how I came up with my slightly tweaked version, which I called the

Cream Cheese Bites

I changed the recipe a bit to suit my taste and my pantry of course. First, I used considerably lesser sugar because I do not want it too be too sweet, it might drown the cheesiness out. Then, since I do not have any wafers, I decided to use the idea of regular cheese cake base, by crushing up oats crackers (this was what I have in stock, you can use anything else, like maybe the usual digestive biscuits), and then press it together as base. Lastly, I do not have any tangy jam to put on top of my cheese bites so I forego it, though I really think it would had been a really nice addition. After baking, the cheese bites puffed up, with one cracked up, and then when taken out, it fell a little. Be careful when removing it as it is really soft right out of the oven, which I had disfigured some of it.

225g softened cream cheese
½ cup sugar (or less)
1 egg
1tsp vanilla essence

6 oat crackers/biscuits

Preheat oven to 180C.
Coarsely grind oat biscuits till grainy, then press it into the muffin holes. (I used the back of a glass to compact it)
Then, cream together the cheese and sugar.
Add egg and vanilla essence, mix till incorporated.
Spoon onto the prepared oat base in the muffin tin.
Bake for approximately 20 minutes until set.
Allow it to cool down and refrigerated for better taste.
Then munch on!

Sunday, April 09, 2006

1984: Birthday 2

I have talked about my good friends 1984 before, and about me making a pact to bake a cake for each and everyone of them this year for their birthday. A customized and personal cake for each of them. The second eldest in the group had her birthday in March, and again, due to all our busy schedules, we had a late celebration.

This birthday girl E, is practically the chatterbox of the group. She chatters about her daily life to us without fail, since eons ago, and she is the only one I know about her life inside out. She would be the one relating stories to each and everyone who is absent from our gatherings, filling in on all the details which I myself might have even overlooked or forgot even if I’m present. She is truly the heart of our 1984 channel of communication.

Well, to be honest, 1984 was not the same as it was before when we were young and carefree in our schooldays, where our only main concern was what to eat in ‘rehat’ (recess). But now, each and every one of us had grown in our own way, lead our own lives and hold to our own principles. Though we may not ever be the same crazy bunch anymore, but somehow our bond is still there. Somehow, somewhere inside us, a part of it is made up of 1984. I know, that no matter what happens in the future, I will always remember that I am who I am today, because a part of me inside is mold and made by them, my beloved 1984s.

Alright, lets get on with the cake! I got to stick to my foodblog theme after all. As for E, she did not make any specific request; she said ‘anything’, one of her favourite phrase. But after drilling her, I found she did not want cheese, no fruits, no nuts, maybe raisins and no coffee. Well, she certainly floored me. I was busy yesterday, due to an extended interview of another fellow 1984 that I took her to, thus leaving me little time to go out and get some crucial ingredients on a cake I initially intended to make. Therefore, I decided to change, flipped through my home baking recipe book and choose the recipe that I happen to have all the ingredients. I did go down to the mini market in my condominium to get the milk and eggs though, easily obtainable.

Caramel Layer Cake

The result of the cake was not really satisfactory. The recipe picture showed a slowly brown coloured cake, which I did not obtain, as I used red sugar (jaggery) instead of brown sugar (that’s what I have in my pantry). Therefore, the resulting cake looked deceivingly like chocolate cake, which J pointed out. The cake texture was not bad, soft and fluffy, but taste wise it was pretty bland, and the caramel coating was not at its best. I guess I made a mistake, taking for granted as one stage in the method requires boiling the mixture to 119C (soft ball stage which I don’t know what the heck is about) on a sugar thermometer (which I do not have). I have yet to make candy and now I know it is pretty impossible without the equipment. Nevertheless, a nice 1984 said yum, and the rest gobbled it without a word, heh, but my dear J tactfully said it’s not one of my best. But oh well, at least I tried a new recipe. Not for keepers and I’m not gonna share it here due to unsatisfactory rating from me. In fact, it is exactly the type of cake I would not buy from the bakery. Here’s the deceiving looking cake (pardon the spur of the moment decoration with icing):

Monday, March 27, 2006

IMBB 24: I Can Make it in 30 Minutes!

When I heard of the theme for IMBB #24, cooking in 30 minutes, and to top it off it has to be a full meal, it got me excited. To me a full meal means it has to be of various nutrients, enough to satiate hunger and to sustain through the day or night. To a Chinese, the fastest and easiest all in one meal could only mean one dish, yes, fried rice.

We Chinese fried rice like it is nobody’s business. There is no standard rule, no recipe to follow and every cook fried their rice their own personal way. Our fried rice does not mean just frying the rice, we add in whatever fresh ingredients we have in the pantry. We throw in this and that, whenever we see fits. In other words, fried rice is basically a dump and fried dish, albeit the prior washing and chopping.

In my opinion, fried rice must be originated from those genius housewives that have plenty of leftover rice everyday and came up with ways to make use of it. Cooked rice from last night dinner could be a quick nutritious whip up lunch for today. Whatever fresh leftovers, could be the extra handful of long beans or the two sticks of carrots or the last chicken fillet, can then be used up to make this magical fried rice. Using the leftover rice was actually the key, as I have been told, since the rice is drier and more tough, thus after frying, it will be at the right texture.

In most Chinese fried rice, the basic secret is in the sauce. Yes, the sauce added when we fried the rice. As far as I usually see, there are two distinct types of fried rice, the white ones or the brown ones. For the white fried rice, it could mostly mean the absence of the dark soya sauce, which is usually used for browning in Chinese cooking. It does have taste too; therefore white fried rice and brown fried rice taste somewhat different, but be careful with the dark soya sauce, as too much added, your dish would be bitter. Usually the white fried rice is added flavour with pepper while brown fried rice is usually heavily laden with soya sauce.

As for me, I have never ever fried rice two times the same way. The basic idea is there, but there are always different ingredients, different mixes of sauces thus different tastes. I fried rice numerous times as it’s my trusty quick nutritional whip up of a full meal. Since there are no ‘proper’ recipes for fried rice, in my context, I would just suggest what is there to add into your fried rice, your take.

It is real quick, especially with leftover rice, it could even be in 15 minutes, along with all the preparation, but if not, I’m sure you can cook the rice first, which takes only about 13 minutes. Be careful to add less water/no water as freshly cooked rice are slightly on the wet side, and you do not want a soggy fried rice. Ultimate fried rice has to be fluffy and every grain is separated. So overall, you will have a complete meal in less than 30 minutes!

Chinese fried rice (must haves)

Basic ingredients


Shallots – my grandma taught me this, as it imparts the important aroma in the every fried rice. Always fried the shallots first, till slightly brown, then add the rest of the ingredients.

Onions – in addition or in absence of the shallots, this could be a good substitute. Brown the onions well too.

Garlic – and lots of it I might say, it is one of the essential basic ingredient in every Chinese cooking, I personally like it finely chopped for fried rice

Eggs – it is this is an essential to seal in all the flavours of the fried rice. The secret is to throw it in at the end, mix thoroughly with the fried rice and the flavour is sealed in with extra kick! I learnt this from Ah Ma too, as not all Chinese cook does it, but I believe most of it does.


Meat (making the fried rice tastier)

Meat gives fried rice its sweetness and the full flavour of it. Though not necessary, but with it, your fried rice would be more kingly tasty and of course, the needed protein. Usually one kind of meat is use, in order to maintain its simplicity and not to complicate the flavours too much.

Chicken – boneless chicken are usually sliced and dice into small bite sizes to be used in fried rice. This is the most common meat next to pork.

Pork – a Chinese favourite red meat, really sweet and juicy and totally gives the fried rice a distinct taste. Usually chopped up, or sliced and even roughly minced for some.

Beef – though seldom used but I had ate some in restaurants, something different but nice too.

Prawn – this is actually the secret to a real fried rice fragrance and tastiness. In oppose to what I said, prawn can be added along with any other meat, it is after all seafood, but it serve the same purpose, and definitely do it much better.


Vegetables (personal should haves)

Veggies are good additions to fried rice to add in the nutrition and also making it more complex in tastes, textures and presentation.


Long beans – these veggies pack a good crunch to the fried rice, thus bringing the texture to the whole new layer. It is good for ya and just right with the fried rice.

Carrots – carrots also pack a good crunch to the fried rice. Have it sliced thinly or finely chopped. Not to mention it add good colours to the fried rice. Who doesn’t love orange?

Spring Onions – though I do not always add this in, as I seldom buy it, they come in huge bunch and I just seldom get to finish it. It is usually used for garnishes in dishes, in this case it is a good addition to fried rice, especially good with the brown ones.

Herbs – yes you could add in any herbs you think is right, like fresh Chinese parsley, or basil or even mint. I recently ate J’s mum brown fried rice with mint; it was tasty and refreshing with every bite on the mint.


Sauce (the usual)

Soya sauce – main base for the saltiness in the fired rice. We seldom use salt in this.

Dark soya sauce – to make brown fried rice

Oyster sauce – for the extra kick

Fish sauce – just for taste

Sesame oil – just add a little at the end

Chilli – sauce or sambal or paste, if you want a spicy fried rice

Thursday, March 23, 2006

CCC Craze

It is always good to be able to dig up my old archive to share with you guys. During the time I started this lovely blog of mine, I was in my term holidays. That was went I did lots of baking and cooking, and sharing it here. Now that time does not allow me to do so, I have continued religiously drooled over many food blogs out there.

So, about digging into my archives, I usually cook, take picture and then store it in a folder in my computer along with the recipe. So far, I just notice this folder getting much larger than other picture folders I have.

There was this local food forum that I joined, named Jo’s Deli Bakery. Then there was once we made a meet up along with fellow Malaysians from the forum Kitchen Capers, that I always talked about. At the party, obviously a food party, everyone is to make something to bring there. Like how we local like to call it potluck. Then a lovely forum member made a wonderful chocolate cheese cake, which got everyone hooked and craving for one. So naturally, we demanded for the recipe and then forth started the phase, we called it, the CCC craze.

If you keep drooling over various chocolate cheesecakes from the same recipe, and keep on hearing people rave about it day in day out in the forum, there is only one natural course of action. Yes, you make one too, not just to answer the craving since the gathering day but also to see what is all the fuss about.

And I have to say, it is all worth the fuss! It is fairly easy to do, and simply delicious. It is hard for me to describe how good, you go try it and you tell me! This might even start a CCC craze in the blogosphere, who knows, as it is really tempting and the result is going to be an expanded waistline with a wide smile.

Alright let us now see what the fuss is all about but be forewarned, it might start you into a phase.


Chocolate Cheese Cake

Making the mixtures was really easy, but layering them was the problem. When I poured in the final chocolate mixture onto the cheese layer, I made mistake by pouring too much in the middle, then end up scrapping it all to the side, which in the end causing the side rim to have too much. Nevertheless, the effect was not bad; I got wave-like layers, which some people thought I did it on purpose.

I also found that I had to take longer baking time than suggested, then later I found out its because I used an 8-inch pan instead of 9. But I will still stick to 8-inch, because the height of the cake is just nice with the layers clearly shown, and of course, it means bigger portion in every slice. You won’t regret it.

Mixture A:
250g cream cheese
60g castor sugar
1 egg

Beat cream cheese with sugar until light and fluffy
Beat in egg until well incorporated
Set mixture aside

Mixture B:
180g butter
150g sugar
3 eggs
3 tbsp cocoa
120g flour
1 tsp baking powder
Pinch of salt


Beat butter and sugar together until light and fluffy
Beat in egg, one at a time until well incorporated into mixture
Sieve all the dried ingredients together
Fold it into the egg mixture

To assemble:
With an 8-inch cake pan, pour in half of mixture ‘B’, then all of mixture ‘A’, then remaining mixture ‘B’
Bake in preheat oven at 180C for 55-60 minutes (45-50 minutes for 9-inch pan) or until skewer comes out clean
Serve well chilled


Wednesday, March 15, 2006

Now and Before

Now:
Not much cooking nowadays but all workload is starting to lessen. My final year project is soon to be over and then I can concentrate on my finals. Then it is off to the work force for me. Seem really daunting yet exciting. All said I am ready to take on the challenge and start a new journey in my life. We all have to learn to adapt to changes and make the best of it. I am glad I have learned to do so. What bout you?

Before:
Anyway, I just remembered this recipe I attempted ages ago (few months) that I have yet to share with you guys. It is from an issue of Flavours, a local food magazine which I am an avid fan of. I came across a simple yet intriguing recipe called Pongteh. This dish is from Peranakan origin, which we called Baba and Nonya. I had wrote bout them before. A glance at the recipe and it got me thinking of it day and night, so I had to put it to an end. I made it.

Pongteh (Chicken Stew with Preserved Soy Bean Paste)

This recipe uses ingredients readily available in most households. Chinese households if not. I’m not sure whether many would have the preserved bean paste, which is actually a thick, salty fermented soybean paste. I believe one can get in any asian market easily. Here, it is a must in this dish as it holds the base flavour of it. Gula melaka is actually unprocessed raw palm sugar, easily available in Malaysia. As the name stated, it is originated from Melaka, home of the Peranakans.

As usual, I had left out ingredients to suit my taste (or my pantry) and tweaked the recipe a wee little bit. In the original recipe, one can add belly pork and also shitake mushrooms and yam bean. In the recipe, it calls for first boiling the sauce with the mushroom for 20 minutes. Once again, I took the shortcut, and since I did not use Chinese mushrooms anyway, I only bring it to boil, cut down added water and cooked to a much shorter time.

The recipe noted that it will taste better the next day after the flavors had a chance to infuse into the meat. I for one am not going to compromise this. The overnight dish was great with the meat deeply infused in the taste, which comprises mainly of the bean paste. To me the taste is unique and it is an overall fairly easy recipe. Do try it!

5 chicken drumsticks
3 tbsp cooking oil

Grind to paste:
4 red onions
5 shallots
6 cloves of garlic

2 tbsp preserved bean paste (tau cheo)
600ml water
5 potatoes (cubed)

40g gula Melaka (palm sugar), or to taste
1 tsp of salt

Heat oil and sauté the onion, shallot and garlic paste till fragrant, stirring continuously.
Then add in the bean paste and fry till oil separates. (This did not really happen to mind as I had lowered the oil content considerably)
Add water and bring to boil.
Lower in the chicken and simmer for bout 15 minutes.
Add in the cubed potatoes.
Continue to cook for another 30 minutes or till chicken is tender and potatoes are soft.
Add water if gravy becomes too thick.
Season to taste with sugar and salt

Added: A fellow reader asked me about what tau cheo to make sure she got the right ingredient, so here it is:


Saturday, March 11, 2006

1984

Since I had ventured into my culinary skills, I had been enjoying making a lot of food, baking and cooking. It is therapeutic in some way to me. I love it especially when I can make food for my loved ones to enjoy. I love the feeling that I felt when I see them enjoying what I had made. I love it even more when they appreciate it; they pat me on the back and praise me (although it might not have been that good). It is just the sense of euphoria, exaggerate I might seem, but I’m not.

Therefore, I came up with an ingenious plan to extend out my love to my dearest oldest longest group of friends that I have. I made a pact to bake each of them a cake for their birthday this year. It might seem like nothing, but the fact that my group of friends consists of 10 people and of high tastes I might say, seem pretty daunting. But nevertheless, it will certainly be a joy to me to make and customize a special and unique cake for each of them.

We called ourselves the 1984, which is the year we were born in. The name was stuck with us since high school and it never seems to fade away. We always say 1984 this, 1984 that, 1984 always, 1984 spirit and 1984 bond, you get the idea. They had been with me through thick and thin since 8 years ago, some even longer, and the stories about them could fill a book, a thick one for that matter. I would write about them if ever I have the time.

Well a friend S just had her birthday in January during Chinese New Year. The time was packed but I managed to make a cake for her, at my nanny’s place. I’ve been lucky to have her kitchen to use, as my Taiping house’s kitchen is such a sad place, you could not even find salt there! Cooking at my nanny had been really eye opening, more about that next time.

I had asked S before hand what type of cake she would want and her reply was really creative and challenging, she said “Colorful”. Wow, a great theme, it got me thinking. I consulted some of the other 1984s, and a friend inspired me. Finally, I made a simple chocolate cake with dark gooey chocolate frosting; and where are the colors you might ask? Well, take a look!


Saturday, January 28, 2006

Sugar not so High Friday #15


Finally I am back in my hometown. These day it was really hectic for me but I just could not pass out the opportunity to join this month’s SHF #15 hosted by Sam in Becks & Posh. So as usual I go for the easiest recipe I can find but of course still very tasty.

Since we are looking for dessert low in sugar and best to feature natural sugar, all I can think of was the Gula Melaka in my pantry. It is an all natural sweet sugar made from the sap of the coconut palm. As the name implies, it is widely known in Melaka and a favourite use among the Peranakans in both meals and desserts. Here in Malaysia, it comes in form of rolled blocks. These sweet rolls have distinct flavour themselves, not light brown sugar or honey or even golden syrup or dark molassess. You got to taste it to know it but as you know, it will always be a star in every sweet recipe if added. Yes it is that distinct.

Gula melaka is usually the star in many of our local Nonya kuih (our local cakes) alongside with the famous pandan leaves that I have kept talking about. It is used to make many other sweet desserts like cendol (I would talk about this nest time). I had even used it to make my macaroons! Really versatile and pair really well with pandan and coconut.

Here I made a really simple recipe using sago pearl. Sago is actually starch from the sago plant which can be made into pudding and is also usually added to many of our local ‘tong sui’like my Hak Lor Mai. This time I made sago pudding drizzle over with little bit of evaporated milk and then drown in gula melaka syrup. Heaven!

Sago Gula Melaka

The recipe here is in terms of guessing and estimating as it is to modify to suit ones taste, whether you want it really sweet, or less or more milk or vice versa. Besides, the amount yield would also differ according to your pudding cups. I made mine in little bowls since I have none. Ah, displaying my lack of kitchen tools again.

100g sago pearls
50 gula melaka
½ cup of evaporated milk

Bring water to boil in a pot
Add sago pearls to boil for 10-15 minutes or all the pearls are translucent (best to keep stirring as I have some stuck at the bottom once left unattended)
Remove from heat, pour onto a sieve and wash with running water.
Drain excess water and put aside.
Press the sago pearls into pudding cups, packing it tight together.
Refrigerate it for 1-2 hours then serve cold.

Melt gula melaka in a pot or microwave with about ¼ to ½ cup of water to it. (This amount depends how diluted you want your syrup to be. Chill.

When serving, unmould the sago pudding onto bowl, drizzle over with evaporated milk then drown it with the sweet exotic gula melaka and enjoy an all natural sweetness goodness.

Yields bout 6 small puddings or 3 large ones


Tagged with: +

Wednesday, January 25, 2006

Coconut Macaroons

Where have I been? Life has been good I assure you. But it does not mean life had been easy. I am up to my neck with assignments and my final year project. With Chinese New Year coming, this coming Sunday to be precise, we at the university had been trying to cram everything into this week, in order to make way for a week long holiday. I will be homeward bound this Thursday, and I promise many pictures of my beloved Taiping and of course, our huge celebration marking a New Year in the Chinese Calendar.

My friend would also be celebrating her birthday next week, and I promised her a cake. I asked her for the flavours she liked, and she came up with a challenging theme, “Colourful”. How creative! It got me excited, yet I have not even thought of what to make.

Rabbit from Pearl of the Orient is hosting this month’s Hay Hay is Donna Day event, which she had won the last time with her really beautiful swirled self frosting cupcakes. I had joined that too at last minute with my Pandan Kaya Frosted Cupcakes. Now I could not pass up this opportunity.

The base recipe is simple and with lots of place to tweak and improvise. Here’s two version of mine. I tried to make it cute for Rabbit, and readers who would be voting, but could not think of any other way than to spontaneously add the little piggie pouncing at the macaroons. Let’s fight for it else it will be gone!

Lemon Macaroons

This I basically just substituted Rabbit’s lime zest with lemon. These are the bunch on the left side in the picture.

2 cups desiccated coconut
½ cup sugar
2 egg whites
1 ½ tbsp lemon zest

Preheat oven to 180C
Mix coconut, sugar, egg whites and lime zest in bowl to combine.
Use a spoon to scoop it onto hand and squeeze to it to ball size.
Place on a lined baking tray and bake for 10-15 mintues or till light golden.

Makes 12-15 fluffy macaroons

Pandan Gula Melaka Macaroons

This one is an Asian twist to these lovely macaroons. It came on an impulse as I thought of my pandan leaves in the refrigerator. It was in a way inspired by an Asian coconut candy that features basically the same ingredients but cooked till thick and then chilled. This one is really good!

2 cups desiccated coconut
½ cup Gula Melaka (raw palm sugar) or brown sugar
2 egg whites
2-3 tbsp shredded pandan leaves

Preheat oven to 180C
Mix coconut, sugar, egg whites and shredded pandan leaves in bowl to combine.
Use a spoon to scoop it onto hand and squeeze to it to ball size.
Place on a lined baking tray and bake for 10-15 minutes or till light golden.

Makes 12-15 fluffy macaroons

Sunday, January 15, 2006

Smokey Goodness with Rendang

I was cruising down the road right after my afternoon class. The weather was fine and I am feeling fresh, something that is amazing since I had endured few hours of lecture. Taking the usual route on my way back, all of sudden I was greeted by makeshift stall along the road, nearby of TTDI, with smokes billowing to the air. Guess what? No, not open burning. If you’re a Malaysian, you might, just might have guess it. Yes, it is lemang!

Lemang is actually glutinous rice with coconut milk wrapped in banana leaves then packed into a tube of bamboo and then smoked slowly over fire. Phew, such hard work. This delicacy may be available throughout the year but it is usually full blown with temporary makeshifts stalls everywhere during festivals celebrated by the Malay communities in Malaysia. The usual celebrations are the Hari Raya Aidilfitri and Hari Raya Haji. This Malay delicacy had been highlighted before by Boo from masak-masak. Boo featured lemang from last year’s Hari Raya Aidilfitri, from the same place I had acquired mine. As for Robyn, from EatingAsia, she and Dave had stumbled upon it along the Karak Highway.

This week on Tuesday, it was the Hari Raya Haji celebration. It is known as the Pilgrimage Day of Celebration, which is to mark the conclusion of pilgrimage activites in the Holy Land of Mecca. What luck I have to get my hand on these ‘lemangs’ as I had missed it last year during Hari Raya Adilfitri. Thus, excited like a school kid eyeing a candy, I scrammed on the break and swerved to the left and came to a halting stop by the side of a stall. (Yes, we Malaysians drive like that). Just as I got down from the car, I was greeted by the enthusiastic seller, whose stall I happened to stop right beside. Since it was, as we Chinese like to call it ‘yuin’ (fate) that I got to this stall I decided to get a tube of lemang from them. They even let me sample one tiny piece. Not too bad I might say. I wanted to get their curries but alas, found my wallet insufficient of money. (I had just paid the bills!).

Once I got home, I thrust the newspaper wrapped lemang to J and asked him to guess what it is. J just tore it off out of curiosity (such impatience) and was as excited as I am for the find too. Ah, but what are we to have it with? J, as the Malay cuisine expert here, said lemang have to have with rendang. Rendang, according to Wikipedia, is actually meat curry, cooked in coconut milk and spices for several hours until the liquid dried up, leaving a thick coating of spicy condiments on the meat. Sounds good isn’t it. Not to worry as the recipe is to follow.

Well, as this is also an entry for the Weekend Herb Blogging at Kalyn, I am featuring a herb used in cooking rendang. It is daun limau purut (kaffir lime leaves). These leaves, as the name implied, impart a strong scent of lime and are really refreshing.

Now let’s go and make some rendang to go with the lemang. Pssst, as I know, it goes well with rice too!

Beef Rendang


This is my first time trying out a tedious recipe but I was adamant. Yet, I was still pretty lazy and had come up with some cheating methods to fasten up the process. I got this recipe, once again from Amy Beh, but had modified the liquid amount, thus reducing cooking time tremendously.

I was shocked by the amount of coconut milk called for in the original recipe and was further aghast by the idea of adding same amount of water. Thus I reduced it by more than half and had even left out the water portion.

When I got to tesco looking for topside beef, there was none but instead I found packets of cubed beef labeled - beef for rendang. Talk about being 'Malaysianised' eh.

Chilli boh is actually just grinded chillies with salt. Thus, if you cannot get it, I would recommend adding 2-3 sliced chillies to the level of spiciness you desire. Just remember that rendang are just spicy-nice, as in not too spicy yet just a tinge of kick.

Next it was the kerisik (pounded dry-fried grated coconut) which I had no idea where to get, so I improvised and bought desiccated coconut. Then I dry fried the desiccated coconut till brown and then pounded it with my pestle and mortar. (If you don’t have one, maybe you can try pounding with your roller pin or something like that. Think creative!)

Ingredients:
500g beef topside, cubed

Grind together:
4 tbsp chilli boh
7 shallots
5 cloves garlic
4cm piece ginger
2 onions
4 stalks lemongrass, finely sliced
3cm piece galangal
1 tbsp cumin powder
1 tbsp fennel powder

400ml thick coconut milk (1 can)

1/2 cup kerisik (pounded dry-fried grated coconut)
1 tbsp finely-shredded daun limau purut (kaffir lime leaves)

Seasoning:
1 tsp salt or to taste
1 tsp brown sugar or to taste

Method:
Coat bottom of a deep saucepan with a little bit of oil and heat it up.
Add in beef and stir fry briefly till all sides are slightly browned.
Sitr in the ground ingredients and stir to mix.
Then add in the coconut milk.
Simmer over low-medium heat for one hour until beef turns tender and the gravy is quite thick.
Add kerisik and continue to cook until the gravy turns thick and dry.
Add seasonings and daun limau purut.
Stir and cook for further five minutes or until beef gravy is sticky dry

Serves 3 - 4

Thursday, January 12, 2006

Exploring My Origin: Teochew Steamed Fish

I have nowadays succumbed to cook in daily since I have my classes and all. If I have the chance, I would cook both lunch and dinner. Admittedly, it is always alternate with leftovers, covered by a new dish, which would end up as leftovers. But once we got the hang of what can be kept and what not, cooking for small amount of people gets easier. I do not have the luxury to cook for a family of 5 or 8 (yes, I consider that a luxury) but I sometimes cook as if I do. J even says that I am crazy. Once I cooked cauliflower curry and it lasted us for five days! Of course not for every meal, but good enough for us to swore it off for a while.

Anyway, it had been quite sometime since I share some recipes worth for “exploring my origin” project. I do most of the time cooked Chinese at home, but most Chinese cookery are pretty simple and in terms of ‘agak-agak’ (estimation). As I have said, we Chinese cook on the whim. When we feel like it we add it, when we taste it with our little fingers, oh yes we Chinese are resistant to heat, we would just add whatever our taste bud tells us to. I have countless times seen my mother’s mother, Pho Pho, did the finger thing. She can easily dip in her finger to a boiling liquid and taste it right away. Of course I’ve tried it a couple of times and burnt my tongue without fail. Maybe one day, when I have cook countless Chinese cuisine, I might just be able to act like a seasoned Chinese cook.

The dish that I am going to introduce today is of Teochew origin. As I had mentioned that I am from a Hokkien dialect, Teochew is another one in our numerous Chinese dialects. They used to say that Teochew are considered Hokkien as well. This is because the Teochew are once Hokkien people, migrating south from the Fujian province to eastern side known as Chaoshan. After some influence from the Cantonese and Hakka, they evolved into a separate dialect.

As Teochew people are also quite abundant in Malaysia, we are very much exposed to their cuisine. Teochew cuisines are well known for seafood and vegetarian dishes. They are also in some way like the Cantonese cuisine, cooking with less flavouring thus enhancing the natural tastes of food, while relying heavily on freshness of ingredients. When I go out to eat in Chinese restaurants, I had a few times tasted a very fine Teochew cuisine, which is their steamed fish. I had tried it in many outlets, though it varies a little, but the main ingredients are there and the taste, are simply superb. If you have the freshest of fish, it would certainly be a heavenly dish.


Teochew Steamed Fish

I had used white Pomfret for this dish but had found those large meaty Grouper fishes I had in restaurants are better cooked in this style. It is because in this Teochew way of steaming, one would end up with a pool of wonderful sour-ish soup from steaming the fish which is really good to lap up with big chunks of fish meat. It is to be warned that this ‘assam’ (tangy) taste soup keeps one hungry till the end of the meal. You just can’t get enough of it.

I had modified a recipe from the trusted Amy Beh at Kuali. Her recipe uses sour plum, which I do not have in hand, thus I substituted with some tamarind slices (assam gelugor) and tamarind paste, which I have in hand all the time because it is used in various dishes, such my Ikan Assam. The result is as close to those out in the restaurants, though it varies a little, but still like I say, superb.

3-5 white Pomfret/ 1 large Grouper (cleaned and gutted)

Ingredients:
50g salted mustard greens (soaked and shredded)
3cm piece ginger (finely sliced)
1 tomato (cut into thin wedges)
2 black Chinese mushrooms (soaked and sliced thinly)

Mix:
1/4 cup water
1/2 tsp sugar
2-3 tamarind slices (assam gelugor/assam keluk)
2 tbsp tamarind paste

Garnishing:
1 red chilli (cut into strips)
1 stalk spring onions (cut into strips)
1 sprig coriander leaves (chopped roughly)

Method:
Make two cuts on each side of the fish. Rub lightly with salt and pepper.
Put fishes on a metal or heatproof dish and scatter salted mustard green, mushroom and ginger slices on and around the fish.
Pour in the water mixture onto the fish and arrange tomato slices around fish.
Steam fish over rapidly boiling water for 12 to 15 minutes or until the fish’s eye popped out. (This is an indication that the fish is cooked.)
Garnish and serve the dish steaming with hot soup!

Serves 4

Monday, January 09, 2006

Weekend Herb Blogging #14: Chrysanthemum

This is going to be a short post from me. Pardon my lack of writing but it is due to me buried in my final year project. Yes, this dear “tham jiak” girl is in her last semester now, with her major project due soon. I am going to graduate in May and till then, it would be busy months for me. Yet, I cannot say that I would have more leisure when I work, so I have been warned. Nonetheless, I am excited to join the new phase of life soon.

For now, I am posting for the Weekend Herb Blogging hosted by our lovely Kalyn. I will be introducing a wonderful herb named Chrysanthemum.


It is used in many sweet drinks and ‘tong sui’ in our Chinese cuisine. When boiled, it would be known as Chrysanthemum tea. Since young I have been told that it is good for health. It is particular known for it's cooling properties.

There is a lovely Chinese history(or rather, legend) behind this wonderful herb; I’m quoting from Flowers and Plants Association:

The Chinese legend tells the story of an elderly emperor who had heard about a magic herb that would give him eternal youth. This herb was said to grow on Dragonfly Island and could only be picked by young people. The elderly emperor therefore sent twenty-four children on what proved to be a long and hazardous journey. Much to their dismay, when they finally arrived at the island they found it totally deserted. There was no sign of the magic herb. All they found was a flower - the golden chrysanthemum, which today still symbolises the Chinese people's ties with their country. Later Mao Tse Tung replaced the imperial golden yellow with the red of the People’s Republic.

There is also a Japanese version of history in the site if you are interested.

Now let’s go brew yourself some healthy drink.

Chrysanthemum Ginseng Tail Drink
Source: Kitchen Capers

Ginseng tail is a type of Chinese herbs. If I am not mistaken, it is the tail part of the ginseng root. It is known as “yang seng xu’ in Chinese. This herb is known for its cooling properties. It gives the drink a type of ‘kam’ (golden) taste. Pretty hard for me to explain this taste as only Chinese could identify to it; like how my Ah Ma always says it that way. Feel free to omit it and you will still have a lovely healthy drink.

Ingredients:
75g Dried Chrysanthemum Flowers
25g Ginseng Tail
2000ml water
Rock Sugar to taste

Blanch Chrysanthemum and Ginseng separately with boiling water.
Boil water and add in Ginseng. Boil for 5 minutes.
Add in Chrysanthemum. Boil for another 5 minutes.
Add in Rock Sugar and taste.
Remove from fire and cover for 10 minutes before serving.

Thursday, January 05, 2006

Double Cheers For The New Year

This would be my update on the New Year party I had with the pictures I finally managed to get from my friend. Well, there was technical problem last night at MSN messenger, thus she could not send to me. We tried today then it was my connection problem. What luck! At last I resort to asking her email me instead. Finally, all is well now. The pictures are here! Another good news is I managed to get the potato salad recipe too. It is really easy. Do try it out!

Spaghetti Bolognaise with asian twist of rich chicken stock and less tomato:


The special Char Chee Cheong Fun (it is hard to take a picture of this black mess but trust me, it is really delish!):


And now for the

Potato Salad


8 – 10 russet potatoes
2 bunches of spring onions
3 cucumbers
10 eggs (hardboiled)
A small jar of mayonnaise (bout 200mk)
Salt and pepper to taste

Cut into cubes the potatoes, cucumbers and hardboiled eggs.
Then chop spring onions finely.
Put all in a large mixing bowl and stir in mayonnaise.
Add salt and pepper to taste.

Serve a party of 20-25 people

Wednesday, January 04, 2006

Cheers For a New Year

I am again late for this New Year entry. I said again because I seem to be always fashionably late for entries. I hope Cooking Diva would pardon me and give me a chance to join in the New Year's Dinner & Recipe Photo Swap, which seemed so much fun! One of my New Year resolutions from this entry onwards is not to be late anymore! I had been late all my life.

I did not get the entry in early enough because the owner of the camera, my friend, who had not sent me the pictures yet! Well, I had to fill in and post up the preparation for my chicken first. The rest of the readied yummy food will follow, by tonight, hopefully. I swear to wring my friend’s heart out if she does not send me the pictures tonight.

New Year started for everyone and a new semester started for me. Well, after enjoying, playing and of course cooking and baking for whole three months, it is time for me to settle down and do what I need to. I will still be posting for sure, but of course, much shorter ones. I love to write, but time is always the limit. I love to research and share knowledge with the world, but again, time and resources is limited.

This year, I celebrated with J in my friend’s place. There is not much variety of food but yet all of it is scrumptious. We had catered for the spaghetti bolognaise, which was rich with chicken stock, not the usual tomato-ey fare but still very scrumptious. Then we had a local flavour of Char (fried) Chee Cheong Fun, which is basically large flat rice noodles rolled up. The usual fare is to serve these with sweet or spicy sauce but as usual, Malaysian loves to fusion recipes to make it our own. If I am not mistaken, these are originated from Hong Kong, commonly known as Cheong Fun. For this Char Chee Cheong Fun, it is actually frying the Cheong Fun like how we would for Char Kway Teow, literary also fried flat rice noodles. Then there was the potato salad, made by my long time friend from Taiping, which was really delish. I had requested recipe from her and of course would be sharing with you guys then. I could not possibly keep good eats to myself, can I? Then there was also some fried frozen nuggets and popcorn chicken. Dessert was canned sea coconut (sleeve palm), yes canned, according to my friend we are suppose to relax and enjoy the New Year, so no working our neck out. After roasting 30 chickens, I could not have agreed more with her. As for me, my humble contribution to the party was

Image hosted by Photobucket.com

Roasted Rosemary Paprika Chicken

I adapted this dish from a cookbook, but as the usual me, I had trouble following recipes diligently, especially when it comes to cooking. Baking, I might still be a good school girl and not bold enough to twist recipes, but cooking, ah, we Chinese cooks by feel and taste. Try getting recipes out of seasoned Chinese chefs and they would be telling you like, throw in a little of that, then a lot of that, a bunch of this and a handful of that. It is then up to you to improvise, judging for what you had eaten. Usually, it is easy, if you had been eating it most of your life.

As for this recipe, after much tweaking, I find the taste slightly too mild. Maybe I was looking for punch on the spice. Luckily it was saved by the rosemary. I used fresh ones, which does make a lot of differences from dried ones. I pounded the spices on my good ol’ pestle and mortar which I loved a lot. It was from my nanny, a small one but well seasoned. If you do not have one, then just grind the ingredients, but be careful not to make it into a paste.

There was a tip from the cookbook which said that roasting chicken in a non-preheated oven produces crispy skins. It was a little crispier then the previous ones which I roasted after preheating, but I still prefer the method of browning it first before roasting, which produce not only crispier skin, but also more delicious looking roasted chickens. Alongside, I had also roasted some carrots, shallots and whole garlic cloves tossed with olive oil, pepper and salt.


30 drumsticks

Pound/grind:
12 garlic cloves
3 tbsp of paprika
2 tbsp of hot chile pepper
5 sprigs of rosemary (stripped)
2 tbsp coarse black pepper
3-4 tbsp of olive oil

Juice of 2 lemons
Salt to taste

Put together ingredients and pound/grind the spices together.
Clean the chicken and cut out visible fats. Then score two huge slits on the thick part.
Rub spices onto the chicken, and try to stuff those yummy stuffs into the slits.
Line up drumsticks on roasting pan.
Squeeze lemons all over chicken.
Slice the squeezed out lemons thinly spread all over the chicken.
Put it into the oven and left to marinate for 2-3 hours.
Sprinkle salt over the chicken.
Roast chicken in 200C/400F/Gas 6 oven for 1 – 1 ½ hours.


The cheering continues here.

Friday, December 30, 2005

From My Rasoi: Kheema

Since I started blogging, I had known so many Indian food lovers and bloggers alike out there. If you want to be swarm by it, go over and get the links from VK of My Dhaba. Meena from Hooked on Heat had suggested a monthly cookout celebrating Indian cuisines in various forms, called as From My Rasoi, literary meaning, from my kitchen. Every month Meena would come up with a theme and for this month, along with the cold period in half part of the world, the theme is “Winter”.

Winter is a tough theme for a tropical gal like me. In Malaysia, it is either rain or shine here. When it is hot here, it can be burning hot. You would not want to be caught out in the sun especially right at noon. In fact, you can have burning sensation on your head. During my high school days, I was a school basketball players and fanatically, we play till 11am when the sun is high and our head is about to set on fire. Although it is really hot around, we are still lucky as the air is humid and never too dry plus we get a fair share of rain all the time. In Taiping, as I had mentioned as the wettest town in Southeast Asia, I had countless times of enjoying the cooling rain while I sleep.

Sometimes I do wish for four seasons like other countries, where we can enjoy the sun in the summer, catch fallen leaves in autumn, throw snowballs at winter and enjoy rebirth of nature in spring. But sometimes, I revel in the fact that we have consistent weather and nothing to worry about, just maybe occasional floods.

So therefore, my interpretation of the theme may vary a lot from people but I feel, as for winter, it is a cold time calling for hot food! Coincidently, all Indian food is hot! And I meant not just the high heat but spicy and exciting.

As for me, this month I will be featuring a really delectable dish that was introduced to me in a recent food gathering. As I had mentioned a few times, I am actively involved in a Singapore/Malaysia food forum Kitchen Capers, where we had organized a meet up, joint with another local forum that I was recently introduced to - Jo’s Deli, last month for both Malaysian members. There, a member had cooked up a delicious and ‘never get enough of’ dish – Lamb Kheema. Oh it got me dreaming of it day and night after the gathering. So, naturally, when everyone posted up their recipes, I try this one out first straightaway.

Kheema is a hot dish which is not too spicy but yet do not lack in taste. It is really complex in flavours although the ingredients are pretty simple and I am quite sure, readily available. According to
Wiki:
This is a traditional Punjabi home cooked dish and is popular with northern Indian/Pakistani people in the Midlands. It is minced lamb curry served with
peas.

Meena had also cooked up some Keema Matar, with ground chicken and peas. I totally agree with her on the part about peas, as I personally feel it is the main ingredient that made the dish at the right texture with the right taste. Not to mention it adds more colour to the dish and of course, more nutrition. Now, without further ado, let me introduce you this hot dish for cold times or to level your winter, if you are in one.


Kheema

I had used ground pork for this dish but found that the lamb that I had in the gathering had much more complex taste, but nonetheless this was also really tasty. This is a simple yet wonderful dish, certainly a keeper in my rasoi!

Grind to a fine paste:
4 slices of ginger (each 1 cm thick)
3 cloves of garlic

250gm minced meat (lamb, beef, chicken or pork)
3-5 tbsps of curry powder (according to level of spiciness)

2 cups of water salt to taste
120 gm green peas (I used 1 can)
1 green chilli (thinly sliced)

Cut into cubes:
2-3 medium sized potatoes (peeled)
2 tomatoes
1 big onion

For frying:
1/2 onion (thinly sliced)
3 cardamoms
4 cloves
1 stick cinnamon - about 4cm long

In a bowl, mix the meat with ginger-garlic paste, curry powder, salt and ½ cup water.
Then heat oil in pan and fry the ingredients for frying.
When onions are soft, add the mince meat and fry till fragrant.
Add the potatoes and stir in 1 ½ cup of water. Bring to boil. Cover and cook till potatoes are soft, stir occasionally.
Then add cubed tomatoes and onions, peas, chilli. Cover and cook for another 3-5 minutes.
Dish out and devour!

Serves 4
* Malaysia * Good Food * Recipes * Travel *Reviews * Asia *