We have moved to thamjiak.com! Please use the search box there to find your current post ->

Tham Jiak: My Recipe
Tham Jiak means in some way "love to eat" in Hokkien. I am a Malaysian Hokkien and truly love to eat.
Showing posts with label My Recipe. Show all posts

Saturday, September 05, 2009

Girl's Day In

“Too bad you always work on the weekends” I exclaimed assumingly, as we were mentioning that we did not hang out enough. You see, U, my kai jie (god-sister) works at days and times that are not the usual slaves of cubicle nations (like poor ol’ me), she could work from break of dawn or till the wee midnight, even on weekends and break on uncertain days of the week. It is nearly impossible to catch her, not to mention that she chose to stay quite far away, even in my context of after 7 years of staying in Klang Valley that requires quite a travelling distance to get to places (in Taiping context), which used to be where I stay in my days long gone. Ah, those were the days.


“Oh, I am off on this Saturday!” June shouts with excitement (through MSN mind you, but I can feel the excitement all the way from her house to my office).


“What!” that is all I can answer at the moment. It was a befuddlement to me. Then the moment passed and I got a grip on myself “We must hang out then! Catch up! What shall we do? Shopping? Eating? Watch a movie?” I babbled on and on like an excited kid that has been promised an all day outing.


“I am afraid of spending too much if we go out, let’s just stay in”, she says, at that moment I flash back to the last time we hang out, we watch movie, shopped and ate indulgingly as if we are some rich tai-tais (wives)having a day out, I blushed. Then a light bulb flashed right above my head, while my eyes roll up where I imagined a picture in my mind – U and I baking delicious stuffs out of her huge, and I mean huge oven that I had ooohed and ahhhed over when I visited her place the first time.


So I exclaimed “OK! Let’s stay in, we cook something and do some baking!”, and her resounding yes! had made my heart jumped with excitement. So that very Saturday, I went out to buy the necessary stuff that I can get at last minute (yes, that’s me again at it) and all my usual ka-changs, before heading off to her lovely home. When I reached, U had already begun baking chicken with baby potatoes and capsicums and loads of garlic. The house is already basking in wonderful food aroma, ah, how I miss those smells which make a house feels like home. Then like some chef cooking at home in her day off, she whips up spaghetti aglio olio with such style and flamboyant, she made me feel like I am eating food from a posh restaurant when we finally dig into the food. At same time we watched a chick-flick that I normally would not be watching, but it is alright because I was too busy enjoying the food anyway.


Finally when the show ended, and with me nearly falling asleep, she asked, “So what’s up for baking? “. When I told her I planned to make three bakes today, her eyes grew wide and I laughed, she just had to pardon me, who is someone that had been deprived of good baking therapy lately. Admittedly, I have not been baking much in recent times, so was a bit rusty on the baking instincts, and also due to ripping off recipes from my ever-long to-do list without thoroughly examining it, out of our three bakes, only one truly came out good. And luckily it was really good, I brought it the next day to work for breakfast, my sceptical colleague took a bite and say “hey, it’s good, just like those you can get in the famous-coffee-chain”. Ah, such things are what bakers or cooks out there would loved to hear, that the people who ate their food enjoys them as much as they do themselves, I did for mine!


Banana bread-fin
Adapted from Slow Like Honey


I called it banana bread-fin because, it was supposed to be banana bread but I made it into muffin sized because I had this bunch of muffin cups around and I want to take the shortcut in baking them. Muffins bake in nearly half the time than bread. Besides, the outcome is more muffin like, possibly due to some of my own modification of the recipes (I am always guilty of this, couldn’t help tinkering). Making it into muffin also gave me the chance to see U in action, where she shows how commercial bakers make muffins quickly, by scooping up the batter with their hand and squeeze into each cups, using their palms as ‘funnels’. We had such fun doing it, we forgot to properly swirl and level the top and coupled with us not putting the muffin cups in proper muffins trays, it resulted in whimsical muffins, where after a long good laugh, I find it quite adorable and it gave a homemade feel to them.


1 1/2 cups all-purpose flour
1/2 cup whole wheat flour
1-1/2 teaspoons baking powder
1/2 teaspoon baking soda
1/4 teaspoon salt
1/4 teaspoon ground cinnamon
2 eggs, beaten
1 1/2 cups mashed banana
3/4 cup sugar
1/2 cup olive oil
1/4 cup chopped chocolates (optional) (or walnuts if it rocks your boat, I would have add this in if I had them)


Preheat oven to 350 F/180 C
Prepare 12 muffin cups in a muffin tray
Mix together flour, baking powder, baking soda, salt and cinnamon in a bowl.
In a separate bowl, combine together eggs, banana, sugar, and oil.
Add in the flour mixture and stir till just moistened (do not over-stir, batter should be lumpy).
Fold in the chopped chocolates (and/or walnuts) gently.
Squeeze batter into the muffin cups
Bake for 25-30 minutes or until a wooden toothpick poke in near the center comes out clean


Makes about 12 muffin cups if squeezed properly!

Saturday, January 24, 2009

Bribing with Cookies

I cannot believe it! Tomorrow is the last day of the Chinese Lunar calendar! I am going to leave for my dearest hometown wee early tomorrow morning along with aunty and cousins, and I can’t wait. Though counting up to tomorrow have been anxious, then turn to stress, then turn to excitement and then now anticipation. I can’t wait to drink my Pho Pho’s heart-stopping duck soup and wrap pieces after pieces after pieces after pieces of lettuce around my all-time-favourite Pho Pho’s jiu hu char. I can't wait to toss the Yee Sang with everyone up so high half of it end up on the table. I can’t wait to casually walk into my Lai Ma’s house again and mention casually that I haven’t had lunch, I hope the same trick works again, but then again, I don’t need a trick to have my Lai Ma pushing food to me. Moreover this year I am armed with New Year cookies for her as well! Hah! It does sound like I am bringing a container of cookies in exchange for a mouth-watering feast, I would say this is such a good deal, agree?

I have baked more goodies after my initial kick-off Chinese New Year baking and finally chosen to remake Green Pea cookies in batches for giveaways because it was oh-so-tasty and not too tedious to make. I mentioned that Peanut cookies seemed like a new cookie for Chinese New Year but oh boy was I wrong, Lily reminisced making these with her grandmother, only that the original called for lard! I stand corrected but I might try again to say these Green Pea cookies should be newer in generation, as I could not recall it before the appearance of Peanut cookies during Chinese New Year, and some even claimed that it was a variation of the traditional Peanut cookies. Correct me if I am wrong again! I do not know what the Green Pea cookies represent in Chinese in comparison to other more obvious cookies, if anyone does know, do let me know too!

As for now, pardon the short post, I need to get ready, pack my bag and head north to celebrate in gluttony. By the way, Gong Xi Fa Cai!

Green Pea Cookies

When I made my first batch, I found that it was too sweet, and so I went about researching on more recipes around the wonderful blogosphere and came about to my own measurement below. Also, on the first time I bought the green peas, it was the Jusco selection packet, that comes in 180g and it seem the green peas do look slightly smaller than the usual snack ones. The cookie came out so fragrant, I bought the same packets for my subsequent bakes! Note that these came salted so I omit the salt in the recipe. Also make sure you grind the green pea fine enough for the melt-in-mouth cookies. Similarly to the Peanut cookies, you should add the oil bit by bit until the dough comes together. This time I was a bit lazy and skipped the egg glazing steps, thus my cookies look pale but it still taste oh-so-good. This time I also learnt from the Peanut cookies bakes and used 1 teaspoon to shape my cookies and it came out just the right size to pop into the mouth.

180g ground green pea cookies
180g all-purpose flour (sifted)
80g icing sugar
80 - 100g oil
1/4 tsp salt (omit if green peas are salted)

1 egg lightly beaten for glaze (optional)

Mix the ground green peas, sifted flour, icing sugar and salt (if using) together till well combined
Slowly add in the oil and mix till a pliable dough is formed
Shape them into balls or use a 1 teaspoon to shape it, and then line it on a tray
Brush egg wash on top of each cookie (optional)
Bake at 180C for 15-20 minutes

Make approximately 84 cookies

Wednesday, January 14, 2009

Finally, Initially

Way long ago initially, I wanted to blog about my gastronomic adventure in Japan I haven’t. Then initially I wanted to do a roundup of the blog for 2008, and that did not happen either. Than it reminds me that initially I wanted to make many things for 1984 and friends’ Christmas Eve party but that did not happen either, though I did manage to make hummus and cupcakes, blog entry to follow, wish I hope would indeed happen on day. So all that initially aside, they have to wait, as I am going to make way for a more appropriate post at hand – Chinese New year bakes, which I had way way long ago initially, I’m talking about few years back here, wanted to bake which now I finally did!

To me the new year has yet to actually start, due to the impending Chinese New Year, it still feel like I am in the counting down mode to wrap up the year-has-been, please tell me I am not the only one, at least not the only Chinese. At first CNY still seemed pretty far away to me, but when I started to plan out some CNY bakes, it dawned onto me that it was only about 2 weeks away. Ah, so much to do, rather so much to bake yet so little time.

Anyway, what brought me into finally baking cookies for this important Chinese festival? That question brings to the story of a dear friend, M. She messaged me one day on a link to a mixer which she was contemplating to purchase in order to do some CNY baking; she chose to ask me because she knew I was a sort-of-baking-and-cooking aficionado, which then renewed the interest in me. I have always, wanted to bake for CNY but have not kick my lazy butt hard enough to really do it as because (insert overused excuses here) so this time thanks to M, I seized the opportunity and proposed to her to have a baking session together! Aha, that would bring this lazy tham jiak to really stick to the plan; she has a baking date to stick to!

So fast forward to the following weekend, I was lugging two big bags of ka-chang (Cantonese dialect’s multi-purpose word for utensils/equipments/anything that you use to do something), to M’s home and then we got started on our project. There were two bakes that day as each of us chose one recipe to attempt.

M chose her many-attempts-since-last-year Dragon Cookies, which she had not yet manage to achieve her ultimate one, which were supposed to be creamy , slightly soft, melt in your mouth yet having a bit of a crunch on first bite kind, if I understood her correctly. I can’t help but to mention here that the batch she baked the day before which she added banana essence due to one recipe which called for it, and a word of advice from both of us here, do not attempt to put banana essence in your Dragon Cookies! It is not a banana cookie, end of explanation. I guess I was her lucky star as finally, that very day that I am there with her baking the cookies she finally achieved her ultimate Dragon Cookie!

M’s Ultimate Dragon Cookies

Note that for this recipe, you would need a cookie press to shape it. Also M had noted that she had tried before with plastic press which has less desirable results especially if the dough is not soft enough, therefore she prefer the metal one that she is using now.

One important thing to understand about making these cookies is the balance between the baking time and the oven temperature. Our first batch was slightly over-baked and really puffed up. After tasting we found that it had a texture of similarity to kuih bangkit, where we even joked we had made a fusion of them, but ah that is not what we want for the ultimate Dragon Cookies, do we? So for the next batch we decided to bake in shorter time, about 10 minutes, and it came out perfect! The next next batch was slightly under-baked though, where we need to put in for few minutes more. Take note that we had the oven on slightly higher temperature due to its nature. Therefore we can only conclude that, the secret here in making the ultimate dragon cookies is to find the balance of time and temperature, also good recipe is a must, we would not want another banana essence case do we? Just remember that the cookies are suppose to be pale white even after baked. Good luck in trying, M tried since last year, so be like her, don’t give up! Also, we are now giving you a tried and true recipe below, so I bet it would save you at least a year, no?

150g butter (room temperature)
150g icing sugar
2 egg yolks
1 egg white
350g corn flour
30g milk powder
60g plain flour

Beat butter, icing sugar, egg yolks and egg white until creamy
Sift flour and milk powder together
Add flour mixture to the batter and mix till fully incorporated
Fill batter into cookie press and press out a line and then shape it (M shaped to S which to me is a sleeping Dragon, there are other who made a flying Dragon - curly long line)on a baking tray
Bake at 160-180C for 10-15 mins


Yields 120 cookies

As for me, I chose to make Peanut Cookies, which not too long ago, I would say about maybe 10 years back that in Malaysia here, it became a must-have for Chinese New Year. If anyone new since when these cookies got into the list please let me know. As a peanut fan myself, I just had to make it, even though I knew it is not going to be easy, as we would first need to dry fry the peanuts patiently and then remove the skins patiently. Preparation is bit tedious, some experience on how the dough should be like would be good, but other than that it is a fairly simple recipe, calling for minimal ingredients.

Peanut Cookies
Adapted from Do What I Like

First dry fry the peanuts over medium heat, remember to stir it religiously. Do not try to take shortcut by frying over high heat as it would result in the peanuts got burnt pretty quickly on the outside but has yet to fully cook on the inside. Then you have to take de-skin them, I do this by rubbing them against a basket, this would also need some work if you have not mastered the skill which enables you to do this in a jiffy. After that the peanuts is ready to be grind till fine.

But simple as the recipe may seem, it also requires some experience in understanding the dough. I added in all the oil and still found my mixture on the dry side but I tried by pressing them together and mould it into a 1/2 tablespoon for shape and it did work, but later noted to self that it seem a bit too big and might use a smaller one next round. But if you want an easier task where you can roll them into balls, you might need more oil to form the dough first. After researching and reading other’s experiences, it seemed that the quantity of oil needed depended also on how oily your peanuts were naturally. Therefore, slowly add in the oil until the dough is able to mould when pressed, or slightly more oil if you need to roll and shape them. These cookies came out with the melt-in-the-mouth texture, with some crunch due to the added chopped peanuts (I crushed them with a rolling pin; before that I tried to smash them against the counter which resulted in them flying everywhere, sorry M). I gave some to Q to try which she said that it tasted rich (even when I did not put enough oil) and she even asked if I have added peanut butter, ah, so it means I have achieved the creamy texture as well. Overall this is a good recipe, if you want full creamy kind then you might want to omit the chopped peanuts, and also remember to take note on the oil ratio.

200g ground peanut
200g flour
1/2 tsp baking powder
100g icing sugar
1/4 tsp salt
100g - 150g crushed peanuts
100g-150g peanut oil/corn oil

Egg wash:1 egg yolk lightly beaten with 1 tsp water

Put all the peanuts into a wok and dry fry over low heat till crunchy
Remove the skin then grind till fineSieve flour and baking powder together
Mix the flour mixture, ground peanut powder, icing sugar and salt together till well combined
Add in the crushed peanuts and mix well (if you are using)
Slowly add in the peanut oil and mix till a pliable dough is formed (see note above
Shape them into balls or like use a 1/2 tablespoon to shape it, and then line it on a tray
Brush egg wash on top of each cookie
Bake at 165C for 15-20 minutes or till golden brown

Yields 35 cookies (for the 1/2 tablespoon size)

I would say the project has been quite successful for Peanut Cookies first attempt and the achievement of the ultimate Dragon Cookies. I am even contemplating to do second round of Peanut Cookies with some tweaks that I have learnt, oh well, we shall see if this lazy tham jiak will get around to that (psst, which might be next CNY!). Still, I think I deserved a pat on the head for finally meeting one of my initially-s, that is baking for CNY! Not to forget one pat for M as well for her perseverance!

Sunday, December 14, 2008

Another Yummy Goodness

Did I ever mention before my love for Jamie Oliver? I have not? Psst, don’t tell J, yes I heart Jamie Oliver like how many other food bloggers as well. Who wouldn’t? He is charming, funny, kitchen savvy and with a big heart to boot. He was after all the man behind the Fifteen restaurant and the campaign against processed food in UK. But I fell in love with him way before that of course; he had me at Naked Chef. Seriously, he did. I have watched his series from television old and new diligently, ask Y she would know (she even used to ask me why and when I am going to make those wonderful things that Jamie made for her). Then later I downloaded some of his series out of desperation and the latest ones had me watching from youtube! I had even contemplated to join Fifteen before, I even wrote in and asked but too bad, the rule is that you must be a citizen of UK to be eligible. I was devastated thereafter, alright I am a bit whee overdramatic here, but I was pretty disappointed though. That is how much I love him.

Anyway, remember my previous post on my advocate on healthy breakfast? Alright, you know where I am heading here, oh-oh Granola Version 2.0. Well nearly, but no. You see, I did had my heart set to improve my version 1.0 to maybe 1.1 or so, yes I have a bit of geek streak in me, after all I work in an IT industry (though I wished it was food industry hah), because I have two new ingredients at hand that would work brilliantly in my granola. My mum went to Hatyai a couple of weeks ago and asked me do I want some cashew nuts, my eyes glimmered instantly, oh yes I do, please bring me some, raw please. My mum was confused when I said I wanted raw, she thought I wanted non flavoured roasted kind, I had to explain, no I want raw, whitish and uncooked kind, she thought I was mad. But luckily I got the message across and she lugged back that packet of gem for me. She also asked if there is anything else that I would want, oh yes I do, dried fruits please, any dried fruits in season will do when she asked and she brought back dried mangoes for along with her supposedly dried bananas which turn out to be banana chips (please pardon my mum, she is not really culinary incline) but that aside, I am so set to make my granola tropical! But alas, I did not manage because there were some technical difficulties (which were just a posh way to say I had a problem) in getting access to my oven, thus the plan deferred. Then I remembered that there was something called muesli, a non-bake sister of granola. Ah-hah! Making muesli would also be like killing two birds with one stone as a faithful reader commented at not being able to make my granola for not having an oven, so no more excuses for ya!

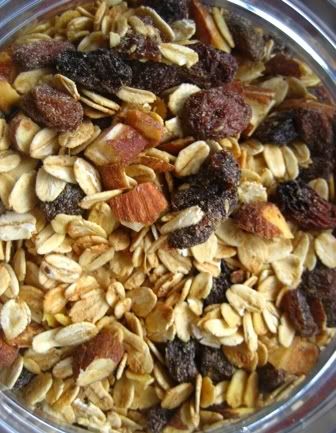
I did some search for the recipe of muesli and voila, I found it at, yes you guess it, Jamie Oliver’s site! This recipe is actually Jamie’s version of Bircher muesli which he named Pukkolla, oh yes he is cute that way, which includes with mixing your own muesli and then soaking it and adding in good stuffs before eating. Just head on to the forum to get his original recipe or you can see my version below. I made my version of Jamie’s Pukkolla which was his version of Bircher muesli. Oh no is this the geek side of me or the crazy side? Anyway, version to version, mine came out so good I am happy with it! I am sticking to the name Pukkolla as it is kind of cool (hope Jamie don't mine), with my running versions yet again! Ah, so geek.

Pukkolla My Version 1.0

Jamie as always advocating ease and rustic kind of cooking, his recipe was in handfuls, just grab and mix kind. I wanted to do that just to feel rustic ha-ha, but the inner female side of me emerged and I just had to measure my things, but don’t worry as I go roughly by cups and not by weight, else you can also convert all the cups to handfuls if you want to be rustic like Jamie. I also had kind of halved Jamie’s recipe as I really do not know what to do if with so much muesli at one time where I am the only one eating it, I also do not want to open my new pack of rolled oats just yet, so feel free to double it. Since I did not have bran on hand, and had the goodness of freshly ground flaxseed with me, I substituted them. Also in Jamie's show, he smashed his nuts in a tea towel, leaving bits of different sizes, which give this mixture an extra depth!

4 cups organic rolled oats
1 cup ground flaxseed
1/2 cup chopped dried mango
1/2 cup sultanas/raisins
1/2 cup crushed almonds
1/2 cup crushed cashew nuts

Dump everything into a very large bowl, use your hand (so we are getting rustic here anyway) and mix everything well together.
Pour into an airtight container and store till when needed

The night before your breakfast:
Scoop half cup of your muesli mix into a bowl or container
Pour in about half cup of yogurt, or just enough to cover
Let soak overnight in the refrigerator

After a good night sleep, on next day for breakfast:
Remove bowl or container from the refrigerator
If you found it too thick, which I did, loosen with another roughly quarter cup of milk
Tuck in and enjoy

After that give yourself a pat on the head for having a wholesome breakfast and for listening to Tham Jiak!

Edited on 18th December 2008

Sunday, November 30, 2008

Breakfast Version 1.0

This month had been eventful; I had a week long trip in Japan and took so many pictures I have yet to really process it. Also, catching up on work after a long break is definitely no easy feat, it took me half a day just to clear my inbox! Somehow though, I manage to finally kick start my baking adventures this weekend. It was not easy as everything is not at hand and I have to dig it out, clean it and start using it. But oh boy, was it worth it.

Since I have started into a healthy regime of sort, I have been looking out for interesting healthy food options. Contrary to the popular believe, I actually found that food which is good for you do taste good as well. Just like the Lui Cha that I mentioned before, all goodness pack into a bowl with plethora of taste and textures, I found another love in muesli.

Muesli stirred into plain fresh yogurt is an absolute heaven to start your day with. This was what I had frequently at work for breakfast, and as expected, I had mixed responses from fellow colleagues. Some do not even recognize what I am having, some cheered me for my good healthy choice while some salute me for being able to stomach it. Well I do agree that muesli is not exactly a normal breakfast fare for Malaysians, where we consume in abundance breakfasts like Nasi Lemak, Roti Canai, roti bakar (toast bread) with eggs, Wan Tan Mee (dried soy sauce noodles) and so on. With such indulging choices for breakfasts here, it is no wondered nobody ventured out further than that.

Of course we also do consume cereals and fresh milk at home apart from the usual bread with kaya, thanks to the heavy advertising by the giants bout 10 years ago but the idea of muesli and yogurt is still lost to many. For me, I thank the wonderful world of food blogging for introducing me to this seriously good, taste and health wise, food. It was also superbly convenient to have whenever you need a fulfilling breakfast or a quick healthy snack.

Ever since I have been consuming packaged muesli, I have been in awe of those who make their own mueslis or granolas. Ok wait, what is the difference between them? I am quite confused at first but from a quick read in Wiki here and here, I conclude that muesli are simply mixed grains, nuts and fruits while granola is a baked version of them. Correct me if I am wrong here, but anyhow, they both serves pretty much the same to me, crunchy goodness of oats, nuts and fruits all in one.

The batch of granola I made was crunchy and fragrant; as expected. Just like many bloggers have mentioned, after you make your own, you find that it is so easy and tasted so good, why would one ever go back to buy packaged one? So if you are one like me who found love in muesli or granola, do try to make one at home or if you are one who have yet to understand its delicious goodness, try it and be converted!

Granola (Version 1.0)

I had used recipes from various bloggers as guidelines to come up with my own version. Thanks to my limited supplies, I was just planning to try out so I did not splurge much on fruits and nut, I made a really simple version of granola. You would notice that halfway through I stirred in ground flaxseed, this is because I totally forgot about until the granola had started baking in the oven, and I had to ground my whole flaxseed then before I can use it. This is my currently working version where I would continue to refine and innovate to come out with an ultimate granola!

1 ½ cups rolled oats
½ cup raisins
½ cup chopped almond
3 tbsp honey
1 tbsp neutral oil
2 tbsp water
½ cup ground flaxseed

Mix all the dry ingredients together – oats, raisins and chopped almond.
Pour the dry ingredients onto prepared parchment paper on a tray.
Mix the honey, water and oil and then slowly stir into the mixture bit by bit.
Mix very well until everything is a bit moist and clumps together a bit.
Roast in the oven at 200°C for 30 minutes. Stir it about every ten minutes.
Halfway through, stir in ½ cup of ground flaxseed for good measure!
When done, take it out and let completely cool before storing in airtight container.

Tip: serve ½ cup of granola stir into 1 cup of yogurt or milk or soy milk of your choice.

Update: Today while munching on my granola I found that some of my raisins were actually burnt, so I would advice to add in raisins maybe halfway through the baking.

Saturday, March 15, 2008

Apples & Thyme: The First Four Years of My Life


Where have I been missing for so long? Happily busy as commented by a new reader of mine? Yea, I would say so. Currently my tasks are getting heavier, where I see myself working later and later but there is one other thing that is making me go crazy, preparing to be a bridesmaid and helping out in my sister’s wedding! Oh boy, now I know that planning for wedding needs so much of an attention. Every little details counts for big things.

Anyway, enough bout me as I am here to tell you a story about an amazing woman. I mentioned about my Lai Ma in my Chinese New Year great feast at her home. I practically spend the first 4 years of my life at her humble home, surrounded with lots of love from her, her husband and her children. There were also chaos and mischief as I had my dear god sister U and her brother as partners in crime.

The story of how Lai Ma became my nanny started like this. My first nanny was not her, but another lady somewhere in Aulong (a suburb of Taiping) and at that time I was about few months old. My mum had to send me to a nanny because she was working and could not take care of me full time. So one fine day, my Pho Pho(grandma) decided to give me a visit, and took a cab to Aulong. She found me at the hall, crying pitifully, desperate for a nappy change and yet with no one attending to me. As she reminisced to me, she found the nanny happily cooking in the kitchen seemingly unaware of my predicament. That was enough for Pho Pho where she called up my mum immediately, and with a recommendation from a distant relative, my mum drove right over after work, pick me up and drove me straight to my Lai Ma’s house. That was how Lai Pa described, where I came in my mum’s car late in the evening, in need of love and attention right into their home that was never deprived of those. And so begin my years of growing up there.

I would say it had been the shaping years of my life, trust me we children do absorb everything like sponge during the first 5 years of our lives from family and people surrounding us. So environment counts and lucky for me, it was a great one. After that it is the school, the teacher and then to friends. So if you had just turned into a mum or are expecting, remember this, the next 5 years is the time you take to shape your child. Anyway, not to divert, so my Lai Ma, her husband and her three children (all in their teens then) had shaped me in many ways. When I finally move back permanently with my family, I somehow felt I was different, albeit a bit on the stubborn and naughtier side due to fact that I was exposed to peers other than your own siblings, so I was somehow the stronger and mischievous one in school, but that would be another story.

Quite a pity though as when I was young, I was a rascal who refused to eat. All I want to do was play, play and just play. So when it comes to meal time, it was either wham bam thank you ma’am and then rush off to continue whatever game that we were in, or it would be a long torturous road of trying to cheat me into finishing my meal. This was how un-tham jiak I was when I was young. Maybe I did not know how to appreciate food then, which I make up real well now, I hope. I even shied away from Malaysia’s king of fruit, the durian when I was young and no amounts of coaxing or brain-washing can make me eat it. This was another real pity thing as my Lai Pa goes to an estate all the time, to hunt wild boars (yes, hunting with big long guns that you would only see in the movies) and also harvest many wonderful fresh local fruits, and one that always came back fresh from falling off the tree is the durian.

So now I am all grown up, appreciating food in its myriad of tastes, smells and textures, that I see how much I have missed then, oh and yea, I do eat durian now and enjoy it very much. Funny how much one’s taste can change so much as they grew up. My Lai Ma’s cooking was superb, sadly that I realized this so much later, but still not too late fortunately. I also learnt that she was an excellent baker only after I had left Taiping for studies, where her husband and children had once bought her a huge mixer (maybe it was smallest at that time), that lasted her for more than 20 years until now, where in occasions I got to use to bake a few cakes with her and even made my first virgin cheesecake at her place, her acclaimed best recipe from those who had tried. It was a really cool stand mixer, like a KitchenAid of that time, where I believed I would have dream and wish for it then like how I wish for KitchenAid now.

From the recent Chinese New Year (the most celebrated occasion for the Chinese every year is still vividly fresh in my mind), I had managed to learn one of her ‘secret’ recipe, the young papaya pickle. It is thinly sliced young papaya soaked in Chinese rice vinegar, sugar and sliced chillies, in glass containers, which can last for ages but it never does, not in my household anyway. I was lucky last year when once during a visit to her house, she had just made a big batch, soaking in few glass containers of various sorts such as jam jar, taucu jar (her favourite) and other sauces jar, just like how we Chinese like to keep these containers/bottles/boxes for ‘just in case’s, which this time, rarely I might say, was really put to good use. She even reminded me to bring back the container the next time I come back so that it can be reuse for more pickled papayas! So, this year when I visit her again, I casually mentioned that I had brought back the containers for her (proudly as I was really famous for forgetfulness, especially in her household of really keen and responsible people), and she was indeed surprised and happy. Then I also casually mentioned that I simply looove those pickled papayas, where I polished off in just a week and had been yearning for more since then. She perk up immediately to know I enjoy it so much and offered immediatly “it is so very easy to make, let me make a batch for you to bring back tomorrow!” I was thrilled yet worried as my plan was to go back with my cousin was right after breakfast, which she waved off as no problem as she said it can be done in a jiffy.

Come the next day, my mum fetched me to Lai Ma’s house early in the morning before meeting my cousin for breakfast to pick up my precious pickled papayas. My mum was also very intrigued and want to give it a try, which later I passed one jar to her (later claimed by her to be excellent) and took two jar back home to PJ. Yes, my dear Lai Ma had made a huge batch for me, where she had skipped her daily morning walk that day just to get to the market early to buy papaya, come back and then slice and soak them just in time for me to pick up before I leave. I felt so loved, people say food is the way to a man’s heart, for me that is the way to a child’s heart, yes I am still very much a child to her, for me at least, and for all time to come I’m sure.

Young Papaya Pickle


When I asked my Lai Ma how do I know how to pick an unripe papaya that is just right for this pickle, my Lai Pa was right there listening, and as I said that he was a wise food enthusiast too, he told me straight away “when you just see a tiny hint/streak of yellow on a green papaya, then that papaya is just right for pickling”. See, I told you my Lai Pa was a wise food enthusiast (and also in many other areas of life, I’m compelled to add), he gave me such an easy and fool-proof method to my pickling journey! The recipe below is more of an estimation as it really depends how much papaya slices you can get from your papaya, how strong your rice vinegar is, and how sweet and spicy you want it to be, so follow it as a guideline and then taste as you go on.

Green with a hint/streak of yellow papaya (sliced thinly)
Chinese Rice vinegar
Sugar
Red chillies (sliced in inches)

Put the sliced papaya into a jar (from your stashed of ‘just in case’ glass containers)
Pour in rice vinegar to 3 quarter full (do not add to full as the papaya will produce more water as it pickle)
Put in sugar to taste, stir in each addition and continue tasting to just right
Throw in few slices of chillies (as many as you like, but for mine I saw bout 1-2 chilly for a jar)
From time to time, give it a turn around (i.e. spoon bottom to top and vice versa so that all the papayas could get to soak), with a really clean dry spoon.
After a while all the papaya will be happily soaking in rice vinegar and its own juices, so then onwards you can keep as long as you want, just remember to take out with clean spoon every time. (Psst, sometimes I dip in with my fingers when I could not resist but no worries, mine do not need to be stored for long anyway).

P/S: I am submitting this entry to Apples & Thymes to celebrate my Lai Ma, just like a mother to me and a mother to her lovely children, and how she play a big part in my life and my love for food.

Update: The lovely round-up of Apples & Thyme can be found at Mele Cotte.

Wednesday, November 28, 2007

Man of the House

Oh boy, am I glad I finally have the time to sit down and write. I barely had time to breath nowadays, sneaking only time in betweens to read my favourite blogs, flitting in and out like a busy bee. Well, all this is because I am packing the house (more like throwing out garbage), selling what I deem not needed, arranging where to put the rest of the boxes, tits tats of furnitures and my many BIG boxes of kitchen appliances, utensils, gadgets and I don’t even want go there now, ha-ha. This is what happen when a cook decide to shift. Again you ask, when just a year more ago I told you I moved into a new neighbourhood. Yes again, this time, I am moving into my own apartment! Yay! J and I had bought an apartment somewhere in the heart of PJ, which I can only officially move in most likely next year, so I have to unload a lot of things now. It is taking up my every weekend, and most of my free weekdays. Then there is the loan, the legal stuff, the call here and there and everything else. In short, it is really exhausting.

Nevertheless, today I was lucky to be release early from a work training today, therefore this post. I have been meaning to post is since the beginning of this month, which was my dad’s birthday. Yes my dad, the pillar of my house and the foundation of my family.

Every dad is special to every little girl, just like how my dad is. Since the day I was born, he had never really raise his voice on me, not to mention laid hands on me. But he had his ways to keep us (my sister and I) in check, his “because I say so” and his silent treatments. No matter how though, I always see through his scheme. I am the little girl of the house, hardheaded at most times but usually using her charms to manja (pamper) her way through his heart. Whenever he tried to put up his steel manner, I would manja if I ever see there is a chance to get what I want (opportunity sighting is learnt throughout the years of living together), so I usually end up with what I want. But I had never abuse this power though, cause at times I know there are many things that even the best charm can never change or get.

My dad is in someway whom we like to tease in Malaysia, China-man, which actually loosely translated to the same style of the ancient Chinese people’s thinking, but not necessarily meaning it in a bad way. He was strict and conservative in his sense, protective towards his only two daughters, and manly about his house rules. Anyway, as my sister and I grew older, he had learnt to take off his protective net, and let us roam ourselves out in the world. So far, as he is always nearby, traveling forthnighly back to Taiping, we always find chance to come out for a dinner during Sunday nights, just like how we used to do as a family those days. During our Taiping days, we always go out for a full fledged Chinese dinner on Sunday night, its like a ritual. Then we would always go to the same restaurant again and again until we are so bored of it we would change to another, and then the vicious cycle begin again. Anyway, no matter what, I love you, dad!

So back to dad and his birthday, this year, mum insist that all of us go back to Taiping to celebrate. So of we all drove back in 3 separate cars, sis and her boyfriend, J and I and then dad, pardon us for the pollution, but as I told you, my mum insisted. Oh well, since she had came up in our numerous occasions, we all agreed to head home. Then during one of our MSN sessions, yes my mum DO surf the net and chit chat on messengers, she casually mentioned that I should bake a cake for dad. It tugs at my heart, I badly wanted to, but I know time is not on my side. Anyhow, due to perseverance, I got up that early Saturday morning, after arriving the night before in Taiping after midnight, and got over to my Nanny’s house and bake a cake, no so direct as I had to decide a recipe then from one of her old cookbooks, drove out to get the remaining missing ingredients (fortunately everywhere is near in Taiping), and came back to bake the


Chocolate Cake with Sliced Peaches

Yes it is a weird combination, I admit. It is the spur of the moment, desperate searching ways to spruce up a basic chocolate cake recipe to make it fit for a birthday celebration. The supermarket is out of cheese, and there are not much lovely fruits to choose from, so I resorted to a can of sliced peaches. Therefore, I had to improvise, I had to make do, and when I assemble it I pray it will work well together, which I can say it did, not exceptionally well as in why-we-never-think-of-this or what-a-wonder-combination kind, but just the alright, it-is-special-and-not-bad kind. But don’t be put off as the chocolate cake itself was good, coming from an old Singaporean cookbook, it was moist, delicious and just right, not too sweet, Asian style chocolate cake. Definitely a must try, and you can then use your own ways to spruce it up or just eat it plain or dip into the chocolate glaze (as I did with the chocolate cake pieces from the cut cake session), it was heavenly! Here goes, by the way I had halved the recipe to make an 8-inch cake.

100g chocolate (use the rich kind, I used Varlhona)

Shift together:
112g flour
1 tsp baking powder
Pinch of baking soda
28g cocoa

100g sugar
½ tsp baking soda
5 eggs, separated (I hope I got this right from memory, missed it out from my handcopy)
155g butter
¼ tin condense milk
1 tsp vanilla essense
1 tbsp brandy

Heat oven to 175 degrees.
Melt chocolate over steaming water (like the usual bain marie kind or my Nanny’s bowl-in-water-Asian-style kind)
Beat egg whites with half the sugar till fluffy. Add baking soda and beat till stiff but not dry.
beat butter and remaining sugar till light and fluffy (old books love this word)
Add condense milk by spoonful into the batter, beat well.
Add in melted chocolate bit by bit and beat till incorporated.
Add egg yolks, one at a time, beat well each time
Add vanilla and brandy, beat till blend.
Pour into the prepared and lined 8-inch pan.
Baked for bout 45-55 minutes (we had some trouble during baking, so do not have the exact right time) or till skewer comes out clean (use this method then)

Chocolate Glaze
Whipped up by me out of memory of many food blogs’ recipes I read and the remaining ingredients lying around

110g butter
110g chocolate

Melt them together over slow heat
Let cool a little and then scoop over chocolate cake

To assemble
Cut the cake in half (this was done skillfully by my Nanny)
Put the top side down, hiding the cracks if any
Slather chocolate icing liberally over the cake (cut side)
Arrange the slices of peach around it
Put the other cake slice over, cut side down
Pour the rest of the icing over the cake, forming a lovely overflowing chocolatey fountain
Nanny and I wish we could devour it then when the chocolate cake is dousing in the chocolate sauce, but we put it in the freezer instead and let it set

Then bring to the party and serves 8 people after a full Chinese course meal for sweet endings

Saturday, October 20, 2007

Icy Treats

Living in Malaysia, where the whether is hot and humid, icy treats are a necessity to us, especially when we were kids. I remember, those times when I was still in my Primary school, a good friend and I used to buy the ice tube of frozen-flavoured-water, usually orange flavour. It is a crude and cheap treat for us then, costing only 10sen per tube, where I remember vividly which the uncle, who is really old but will stand diligently everyday at our school gate selling his home-made creations, will snip the knot at the top off for us. Then we would take it and pour into our mouth the sweet water that has melted and then proceed to suck on the ice. Ah, I remember feeling really cool and happy every time after the treat, and not to forget the frozen little fingers for holding on to the tube.

Then we got on to our secondary, and then it was those days of ice-cream on the stick, where there is one of my favourite, which has vanilla ice cream wrapped with very-green lime frozen ice. Definitely not the usual combination one would hear of but one that is loved by many of us. That is also when the emergence of more processed ice-creams in oppose to these home-made versions of yesteryears. Then there was also the occasional treat of McDonald’s sundae cone on top of the Value Meal, where every Saturday, after our society meet, we 1984s would walk there from our school.

Soon I came to KL, where eventually, my spending power increases bit by bit till I got into the rat race. So it is now more of indulgence in terms of calories and money for me, where I go for ice creams in Baskin Robbins. There was once, Y and I chance upon its 31% off promotion for every 31st of the month, where we both got a pint each and sat down on a bench nearby and finish it all in one sitting! Ah, those were our uni carefree indulgence days. Then I also go to Swensens’ a couple of times for their earthquake promotion only on Tuesdays, consisting of 8 scoops of ice cream of your choice, where J and I had managed to go a few times. Nowadays, when J and I just want a quick fix of icy treats, we will drop by Macdonald’s drive-thru’ and get ourselves the McFlurry sundae.

So since my histories and currents of ice creams or its like in my life, one of the special additions was my ice cream maker. It had been such a long time since my last post of my own-home-made icy treats. As I mentioned, I had tried many attempts before I fell in love with THE Chocolate Gelato, oh so smooth. Just quite-sometime-ago, I got struck again with the churning bug and churned out some really deceptively and surprisingly delicious


Banana Fro-yo
Inspired by Jaden’s Coconut Frozen Yoghurt

Jaden’s post of suggesting churning Greek yoghurt (strained yoghurt, hence more cheesy-like) to turn into one deceptively healthy icy treat got me really interested. I have been looking out for Greek yoghurt since then, and since I have been working at KLCC for the past few weeks, I had a chance upon it in Cold Storage supermarket, but was definitely put off by the price! It cost nearly four times more than the regular yoghurt! Oh well, it was never ‘cheaper’ for making one’s own ice cream/gelato/sorbet but it is definitely ‘healthier’ in the sense that you can choose what you put in it. If you ever have the time to read into those ice cream ingredients, I bet you can find hydrogenated oil as the main as well as much you-can’t-even-identify stuff even after all the science classes we put ourselves through high-school. Besides we can make all sorts of exotic flavours by harvesting on our local tropical fruits for various concoctions. Anyway, back to yoghurt, so since the Greek yoghurt is crazily expensive here, I decided to get the regular one and since I do not have the patience to strain it, I thought that banana would be a very good ‘thickener’. So I got a bunch of ripe-to-blacken banana that the seller is happily to let off for just RM1! Now we are talking ‘cheap’ and healthy!

300ml plain yoghurt (mine was slightly sweetened)
1 bunch of bananas (bout 6-8), sliced
1 tbsp of sugar (only needed if your banana is not sweet enough)
1 tbsp honey, melted

Blend the yoghurt and sliced bananas together till smooth.
Add in the sugar if needed and blend till incorporated.
Pour into a container and chill overnight. This part is crucial for the flavours to meld and develop, as well as for the banana to ‘thicken’ the yoghurt.

Next day, pour the thick ‘banana-yoghurt’ into an ice cream maker and churn for 40-45mins (or according to manufacturer’s instructions).
Then scoop, yes scoop because it will be very thick (looked like the mess in picture above) and level into a freezer-proof container.

Can be serve soft immediately (J’s sister and I had a huge spoonful each) or store in the freezer.
Before serving from the freezer, take it out for bout 5-10mins in room temperature or bout 30mins in the refrigerator.

Yields: approximately 1 quart

Wednesday, October 10, 2007

One-nine-eight-four: Ra-ta-too-ee

Have I tell you about 1984? Oh I have, many times it seems. How have we been? I would say we have our ups and downs, our disparities and commonness, but still till now we are as we are, always 1984. I’m sure you readers now have your hair standing, ha-ha.

1984 is the year we are all born in. It is the year of the Golden Rat, for the Chinese. All of us actually got together during our teens, when somehow we find commonness among ourselves. As my grandmother taught me long time ago when I was just a little kid, “birds of a feather, flock together”; I did not know then that this quote would apply to me personally as well as anywhere in this world (read the news and you know what I’m talking about) so well. But after we graduated from high school, we all started to grow different feathers, inevitably moving towards very different directions. Out of sentiments I guess, up till now, we are all still trying our very best to keep in touch, maybe once a while flock together.

I had just deleted a paragraph that I wrote about us, our timelines and so forth. Why? I feel that it would bore you readers with too much detail. Then I remembered a story I written quite long ago, at the time when we were in the midst of nearly breaking apart, to metaphorically describe 1984’s and my journey thus far:

The One Behind

Walking down the road, she turned and stared at the distant. She shields her eyes from the glaring sun. She squinted to see it. She knew that it is there. After some time, her eyes adjusted, and she can see the beautiful house, seemingly shining among the sky. Her eyes watered from the strained, yet she continues to stare. Giving a final look, she turned and went on her way.

The road in front of her would be long. It would be certainly different from the comfort life in the house. But she knew she had to move on. She had to walk this path, in order to fulfill her destiny. It is inevitably part of her life’s scheme. But yet she knew the life she once had in the house will always be in her heart.

As she moved along the road, her perspective of it seemed to change. When she left the house, the road seems narrow, rocky and steep. It seemed really hard to tread it. Yet now as days go by, the road seems bigger, wider, leveled and smoother. Her feet, once dragging on had begun to start walking. As she walked on, it started to skip along. The road now seems very enjoyable.

As she was walking down the road, the house is still in sight right behind her. It is always there for if ever once, she stumbled and fell, and she can always turn back and see that support is there, just within reach. Once a while, she did tripped and she did fumbled on the rocks on the road. And every time, with knees and hands on the floor she would look back and be reassured by the sight of the house and then with renewed strength, she would once again stand up and resumed her walk.

As days goes by, she learnt to skip the rocks, she learn to look for holes and she learn to tread with care. She had found walking the road so much easier. Along the way, she found more things to do, other sights to behold, flowers to be picked, sceneries to be enjoyed and wonderful breeze to revel in. Thus, she was so caught up with all these pleasures in walking down the road, the house seemed like a distant fading picture.

But soon she realizes something is missing. She enjoyed the sights. She loved the smell of the flowers. She stood in awe of the sceneries and she got swept away by the cooling breeze. Yet she knows she would not be here enjoying all these if it wasn’t for the house. So she stopped in her tracks; and once again turn back to look at the house, this time not for assurance, but just because.

She smiled, as the house still stood looming there, shining before the bright sky. This time, the sun did not even seem to bother her. With the image in her mind, etched deep in her memories, she returns to continue down her path. This time, there is even more spring in her steps.

Alright, now this post is getting a little heavy for a food blog. I thank you for your patience if you are still reading, so let’s move on to the food! Recently, one 1984 had a housewarming, and we decided to have steamboat along with a side dish (definitely my idea), which I volunteered to cook up ratatouille for them. Why ratatouille? Besides the fact that this dish had just won the hearts of many in the famed movie featuring the tham jiak Remy, it is also the fact that the movie had at one point of the show that I felt most compelling is the part where the once tried Remy’s ratatouille, the cynic Anton Ego was snapped right back to his childhood where he came home to a dish of ratatouille lovingly prepared by his mum. That scene got right to my heart. This is how the best food should be appreciated. This is how I had tried very hard to describe my Ah Ma’s cooking long time ago. This is how no matter where we go, how far we traveled, how many food we taste, it is always back to the basics, the most simple and humble dish churn out lovingly by someone especially for you. So this is why I chose ratatouille, to churn out this dish with my heart for my fellow 1984s, after such a long time that we finally reconcile in a home, so that when many years down the road, if they ever taste one nice (let’s just assume mine is good now) ratatouille, they would be snapped back right to that night where all of us sat together at the table laughing and eating good food.

Ratatouille (ra-ta-too-ee)
Adapted from Flavours (Sept-Oct 07 Issue)

Since I was privileged as a cook, I had my friend to do the grocery shopping for me. I had sent them the needed ingredients prior to this. Imagine, halfway between their shopping they called me up and ask me what the heck is zucchini? I laughed and told them to skip it then if they can’t find it. They also asked where to get rosemary (I was thinking of the vacuum-packed fresh ones), I tried to explain where to get it in Tesco but finally they end up buying me bottled dried rosemary. Then besides, they overlook the ingredient of canned tomato puree which is essential to this recipe. Oh well, I have to make do with what I have and improvise.

Therefore I ration some of the fresh tomatoes out and made my own tomato puree. I found that do not need to simmer for 1 hour (as per original recipe) as I see that everything is well cooked and the eggplant is starting to turn black and soft. Maybe because I altered the amount of tomato puree, I’m not sure why though. So use your own judgment when you cook it. The recipes also states that it will develop taste overnight but we can’t wait eh, we are having party! It tastes great nevertheless, with convictions from my friends.

2 long purple eggplant
salt for sprinkling
2-3 tablespoons olive oil
1 onion, cut into cubes
1 red capsicum, seeded and cubed
1 green capsicum, seeded and cubed
3 cloves garlic, chopped

150g tomatoes, peeled and cubed
1-2 tbsp dried rosemary
sugar to taste
salt

handful of black olives, seeded and chopped

Tomato puree:
50g tomatoes chopped finely
Salt to taste
Sugar to taste
3 tbsp of tomato sauce
Mixed herbs

Preparation:
Split the eggplant lengthwise and sprinkle with salt to draw out bitterness. Set aside for 30 minutes, drain and cut into 2cm cubes
Prepare the rest of the ingredients as per above
For the tomato puree:
Sauté the tomatoes till soft, adding in salt and sugar to taste.
Smash the tomatoes while cooking it.
Then add in tomato sauce and sprinkle liberally with mixed herbs
Cooked till semi-dry and remove from pan then set aside
For ratatouille:
Heat the oil in a heavy-bottomed or cast iron pan. Add the eggplant and cook until lightly browned. Remove and set aside.
In the same pan, cook the onion (add more oil if necessary) until translucent. Add the red and green capsicums and cook until tender; add garlic, eggplant, zucchini, tomato and tomato puree. Cook for 1 minute.
Sprinkle in the dried rosemary liberally as well. Then add in the olives.
Simmer over low heat for 10 minutes.
Season to taste with sugar and salt, but I find it unnecessary since my home-made tomato puree is already very well seasoned.

Serve immediately to a table of 10 hungry girls

Friday, December 08, 2006

While I am Away

The internet connection was down in my hotel now. So I started writing. I guess when you stop reading you start writing, a good theory no? Well, I have yet to fully gather all the picture and information on Bangkok food, so this post would be about something else. Though it is Bangkok related, as it is about the cookie I baked for J, for his breakfasts and munchies, while I am gone, for I won’t be able to go to our daily breakfasts and to catch him out to grab some food at odd hours.

Before this, J commented that I can bake good cakes but not cookies. I protested defiantly, after all I am a baker, I bake everything well! Or so I thought I did. So I baked a batch of my Godsister’s chocolate-walnut-oat-chocolate chip cookies, which unfortunately did not turn out too well just because I so happen to ran out of baking soda, and acting smart, I added in baking powder as substitute. The cookies turn out with good texture and all but it tasted slightly off to me and definitely very off to J. Later I found out that the baking soda in the recipe serves as not only rising agent but also to counter the acidity of cocoa powder, which explains the off taste of my cookies. Turns out my plans to change J’s mind on my cookies had just backfired and now he is even more sceptical of it.

I let the issue pass, and then the news came that I have to get to Bangkok for a business trip. I just wanted to make something for him while I am gone (though I did not expect it to last the entire trip knowing him, ha-ha), then the thought of regaining his faith on my cookies came to mind too. So I decided to bake him cookies for my away-trip, that’s what I call killing two birds with one stone.

This time I finally manage to bake a batch of cookies that could erase all the doubts on my cookies-baking skills. I had my housemate eating non-stop while I keep baking batches out, which I packed it and sneak out a batch for her too. J commented that the taste was great this time but he asked, “Why was it not crunchy?”

“It is supposed to be a chewy cookie! Don’t you like it?” I exclaimed.

He nods and continued munching, but I was not satisfied with it. I asked, “Is it that you like crunchy ones?” He nods again and continued munching. Being too late, and I am to fly off in a day, I vowed to bake a super-crunchy-and-addictive cookie when I come back from Bangkok. For now, these batch of cookies will do.


Chewy Chocolate Chunks Cookies

These cookies are really great, if you are looking for the chewy kinds. It would not be too chocolatey, in the absence of cocoa powder (which is why I can use baking powder here instead of baking soda), but chocolate enough with all the chocolate chunks. And the presence of salt brings out the flavours, though my salt was a bit coarse, but once a while biting on some salt was a welcome taste through all the sweetness.

I adapted this recipe from few sources and adjusted to what I have, such as my lack of baking soda and vanilla essence plus chopping up the remaining block of chocolate that I bought for my Y’s birthday cake. The chocolate chunks turn out to be really good, so much better than chocolate chips I believe. Try it, especially when the cookies are just out of the oven with the chocolate chunks in the gooey stage (yes, I was my housemate’s partner-in-crime on eating thorough the batches), after all this is a baker’s privilege. Enjoy!

1 cup all-purpose flour
1 cup whole wheat flour
½ cup rolled oats
2 tsp baking powder
1 tsp salt
175 gram butter
½ cup white sugar
¾ cup brown sugar
1 egg
1 cup chocolate chunks (200 gram)

Preheat oven to 180C and prepare baking sheet/pan, lightly butter.
Sift together all-purpose flour, baking powder and salt.
Then whisk together with whole wheat flour and oats.
In a large bowl, cream together butter and sugars, till light and airy.
Slowly add in the flour mixture till nearly combine.
Sitr in the chocolate chunks until well distributed.
Drop by teaspoonfuls onto prepared pan.
Bake at 180C for 12-18 minutes, until lightly browned.
Remove to wire rack to cool.

Makes about 36 cookies (included baker and partner’s stolen ones)

Sunday, November 19, 2006

Ultimate Chocolate Fix

Before this, during the summer at the other side of the world, the food blogging communities had gone into the frenzy of making icy desserts which got me totally hype up and weak to my knees. After all, living in this part of the world where it is practically summer everyday, it seems so right to have my icy treats all the time. I love the local favourite is of course such as ais kacang, sai mai lou and cendol, but sometimes, some dessert are just universal, yes, that is ice cream. I believe it is one dessert that no one can say no to, besides chocolate of course.

Well, after getting bombarded with all the ice creams, gelatos, sorbets and frozen yoghurts, I nearly succumb to getting an ice cream maker. I told myself, if I found one that I can afford, I would definitely buy it. Then one day, while out with J, at a fair, I saw a tiny one on promotion and nearly bought it but in the end got against it because it cannot fit into my mini refrigerator. I was nearly devastated. Then on that week itself, J’s mum wanted to exchange some gifts from the points she collected from the credit card, and voila, J chose that ice cream maker itself for me! I was totally ecstatic.


So it came, and I excitedly tried out a few recipes. My first banana ice cream, with my own adaptations of recipes came out too hard. I wouldn’t really call it ice cream though as I made it without cream, if you’re a long time reader, I mentioned before why I usually go for alternatives. Then the next one I tried was mango ice cream (I don’t really know what type so universally I will call it ice cream even without cream), using gelatin which has better texture. Then I tried one mango frozen yoghurt, which was also not so perfect yet.

Then I came across recipes for gelatos and I got hook instantly. No cream but still rich in its way. As gelatos are uncommon here, in fact I believe I never had one before, so I must try it! I was inspired by a recipe from The Traveler’s Lunchbox, where she explained what gelato is all about and then try out three different recipes for us to gape at. I chose the recipe that she and her husband decided was best.

Now the verdict from me? It was totally utterly (pardon the pun but it was necessary) delicious! Now I would understand what the craze about gelato is all about. The texture was just right with enough richness and feel, and the taste was incredible, the ultimate chocolate fix for any sudden crave. J mention it was a little bitter, but it was because of me as I had reduced the sugar level and used really dark chocolate due to my affinity for, of course chocolate, which I overlook as a personal preference. Nevertheless, J likes it too, and I promise to come up a vanilla (his favourite flavor) gelato soon. After this gelato, I believe I would never eat another chocolate ice cream again the same way.


Chocolate Gelato
Source: The Traveler’s Lunchbox

Although I had reduced the sugar content for my own version of chocolate heaven, I believe sticking to the original quantity below would be fine and safest for all to love. Anyhow, I believe it would be good. Oh ya, since my freezer was a quite strong, I would take the chocolate out and leave it for about 5 minutes (really impatiently) and then start digging in. Now I have to make another batch.

2 ounces fine-quality bittersweet chocolate
1 1/2 cups whole milk
1 cup evaporated milk
3/4 cup + 2 tablespoons superfine granulated sugar
1 cup Dutch cocoa powder, sifted
4 large egg yolkspinch salt

Coarsely chop chocolate.
In a saucepan, bring milk, evaporated milk and half the sugar to a simmer, stirrin till the sugar dissolved.
Remove pan from heat and add the cocoa powder and chocolate, whisking till all the chocolate is melted and the mixture is smooth.
Get ready a large bowl of ice and cold water.
In a bowl, beat the yolks and remaining sugar and salt with electric mixer till thick and pale.
Add hot chocolate mixture in a slow stream, whisking, and pour into saucepan.
Then cook the custard over moderately low heat, stirring constantly, until a thermometer registers 160°F (for me, I follow Melissa’s advice and go by instinct, watching not to let it boil)
Pour custard through a sieve into a metal bowl set in ice and cold water and cool.
Chill custard, covered until cold and preferably overnight.
Then freeze custard in an ice-cream maker.
Transfer to an airtight container and put in freezer to harden for several hours.

Yield: about 1 quart.

Thursday, September 21, 2006

Cupcakes-ful of Love


Been on a blogging hiatus and I guess there are no better reason than that I have been having fun and eating well. Oh yes, just had two weekends getaway, which the latest one have me and J on a gastronomic excursion up north, no prizes for guessing where it is. Yes you have said it, Penang the food haven of course. The place where all foodies claim to be the one place you must go to stuff your face if you are ever in Malaysia. The place where even when the Penangites themselves have long move out from their hometown, would still scuff at the every apparent mock-Penang-food they find, which are vastly available everywhere in Malaysia. I leave this now to your desires until the time I post up my honest tried and enjoyed reviews. Don’t frown yet, as I promise more than a few posts of my gastro-adventure coming soon, so bear with me for now as the focus should be on J.

Why you ask? Well, it was actually J’s birthday the past 12 days ago (so that’s the REAL reason behind the absence), and so we had been on a prolong celebration. The trip was actually meant for him, but being such a sweet guy, J went on with me to do what I love most instead, that is to EAT. Ah, such tham-jiak-ness to a point of no return. How did J put up with these? Could it be because I could churn out
his greatest weakness anytime, tempt him with many cakes, trying variations of our vices, reward him with surprises from time to time, whip up something when hunger strikes and also many of my little Chinese cookouts that I tried, reenacting my Ah Ma’s simple dishes.

Aside all these, all I know is that he is putting up his best with me and my food such as my camera frenzy, especially after I got the new one, where I need to take every picture of every food before consuming, as if it’s a ritual (does anyone out there have the same problem as me?). Sometimes he just wants to dig in straight but I had to warn him not to touch it until I take a decent shot (which takes quite a few tries) and sometimes I just had to give in and let the hungry boy down his food (especially when he is having the tham-jiak face on too). Then he also has to put up with certain degree of humiliation when I go around taking picture of people preparing food. You will sure hear more of these in my Penang-tales to come. In despites the once a while frowning, J had been a great partner in crime of my food endeavors. He had
came early in the morning to try my new bakes, bring me to breakfasts (my favourite) and try out new places (knowing well I would go into the picture-taking frenzy), search high and low for some place I read on some foodblog which I insist I must try (or die), and taking me to places he tried which was superb and he would want to share it with me. How much more wonderful can a foodie have from her partner?

Well, I would not be going into details of how J is, I guess the aforementioned of him and my tham-jiak-ness shall suffice. As for now, the cake, the one ultimately should have been the reason of this post. For J’s birthday I wanted to make something special, something different from my
1984’s cakes bake-out. So I decided to make him cupcakes adorn with letters on top to form a certain message (it shall be between us). No prize for guessing again, oh yes, I made it with chocolate and cheese. After all this two combination meant a lot to us.


Black Bottom Cupcakes with ‘Icing’ and Chocolate Love Letters
Adapted from David Lebovitz, at Leite’s Culinaria

I did some variations on the recipes, substituting chocolates with chopped Oreos that I happen to have extras on hand (ok I admit it’s a big purchase from my company’s warehouse sale). That move actually causes semi-disaster as the cheese portion overflow and was left with ugly bumps on the top of the cupcake due to the huge Oreos chunks. So I had to come up with last minute idea to cover it. I found that the cupcake was not really sweet (yes, I gobbled up one, but just because it split to half due to my clumsy hands when releasing it for the first time), as I had lessen the sugar amount in the original recipe. So I decided to sprinkle the cupcakes liberally with icing sugar till most of the ugly bumps are covered, and then adorn it with chocolate letters. When J tried it, he said it was the best (cup)cake I had ever bake (he had too) and then commented that it has frosting too! Then later I realize that he thought the cheeses was the frosting, as I had bought an inferior cream cheese instead (cause the shop I went to ran out of Philadelphia), so it was not cheesy enough to be noticeable. If I am ever to try this recipe again, I would make sure I buy good quality cheese, stick with chopped chocolates instead of Oreos, stick with the sugar ratio and would pour in the cheese right on top of the chocolate batter; instead of how I tried to spoon it in initially (you wouldn’t want to know how).

250g cream cheese
Scant 1/3 cup of granulated sugar
1 egg
60g of bittersweet chocolate, coarsely chop (which I had substitute with Oreos)

1 ½ cups all purpose flour
1 cup loosely packed light brown sugar
5 tbsps Dutch process cocoa powder
1 tsp baking soda
¼ tsp salt
1 cup water
1/3 cup olive oil
1 tbsp white/red vinegar
1 tsp vanilla extract

50g chocolate
25g of butter

Cheese Filling:
Beat together cream cheese, sugar and egg until smooth
Stir in the chopped chocolate pieces
Set aside

Cupcakes:
Preheat oven to 175C.
Butter a 12 cup muffin tin, (or like me bake it in two batches of 6 holes muffin tin, I had a small oven remember)
In medium bowl, sift flour, cocoa powder, baking soda and salt together.
Mix in the brown sugar.
In separate bowl, combine the water, oil, vinegar and vanilla.
Make a well in the center of the dry mixture, then stir in the wet mixture, till smooth
Do not overmix
Divide batter into the muffin holes, using a spoon, pour the cheese filling into the center of each cupcake, up to the brim
Bake for 20-25 minutes, or till top are golden brown and feel springy when pressed

Frosting (less than an hour before serving a birthday boy):
Melt the extra chocolate and butter in the microwave, stir once a while
Set aside and let cool
Pour it into a piping bag, or like me a ketchup squeeze bottle
Sift icing sugar on the cupcakes generously, till fully coat the top
Squeeze out the chocolates in letters you desire onto the icing sugars

Serving:
Stick one little candle on one of the cupcakes
‘Surprise’ the birthday boy
Sing the age-old song
Demand him to make a wish first before blowing out the candle
Then make him eat at least two cupcakes
Later sneak into the kitchen and try it out yourself

Serves a birthday boy, the baker and his family (12 cupcakes)

* Malaysia * Good Food * Recipes * Travel *Reviews * Asia *