Christmas is
A time for gathering
and a time for sharing
A time for giving
and a time for receiving
A time for rejoicing
and appreciating
A time for embracing
and a time for reminding
How much we are loved
Merry Christmas to all!
We have moved to thamjiak.com! Please use the search box there to find your current post ->


Well, J might have seen his mum did it before; typically he was not sure how exactly was it done. At that time, I do not have a microwave yet and decided to do it over the stove. It did pop but only half of it, with the other half burnt and stuck to the bottom of my saucepan. I have a similar problem, but with 70% success rate at second try. Then finally, I chuck my maize away in the corner of the cupboard. Then recently, I got my microwave! Hurray! So J and I put it in a container, with a knob of butter and finally it did came out nice, but sadly, still with about 15% non-pop at the bottom while also, unfortunately, slightly disfigured my container. I nearly gave up on my popcorn adventure but no, yesterday night, I just had the urge to finally make it right. I decided to use my trusty non-stick pan this time and finally had a 100% success rate! I was ecstatic.
Do try out making your own popcorn as, my huge bowl of popcorn, which cost me around RM1-2 compared to the popcorn sold in the cinema at RM6++ for maybe less the amount. You do the math. Besides, I’m pretty sure my popcorns are much healthier too, with no butter or preservatives plus more delicious with extra own spices. Now I am thinking of sneaking these lovelies into the cinema; lets all be converted together! But first I got to find a big hand bag.
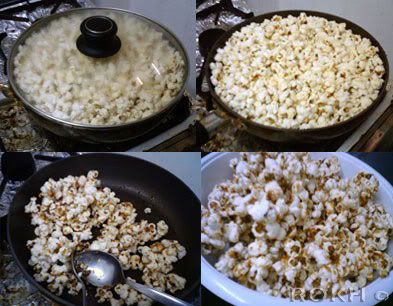
Cinnamon Caramel Popcorn
2 handful (1/3 cup) popcorn
1 tsp oil
Drop oil on pan and use a tissue to spread it all over, coating the pan.
Heat it till hot.
Add in popcorn and cover. It would helped to use a glass cover so that you can watch the corn popping, not only for pleasure, but to know how to handle it.
While it heats up, do some other stuff, watch TV, surf the net, clean the kitchen (as if) or just sit down and dream.
It’ll be quite sometime till the first “pop” is heard.
From here, you have to watch over it.
Shake the pan once a while. This is to avoid some un-pop corn and also burnt ones.
After some fascinating ooh ahh seeing the corn popping and also some shakings, the popping stops. Remove from heat.
The coating:
4 tbsp of brown sugar
2-3 tsp of cinnamon
Heat brown sugar and cinnamon over a saucepan.
Stir it occasionally to avoid burning.
The brown sugar would soon sweat and then melt into a lovely caramel.
From here take note not to over cook it or you’ll get black and bitter stuff.
Put in the popcorn by batches on the caramel and coat it roughly. You might not be able to coat all but just the better else it would be too sweet. You’ll then get huge chunks of popcorns sticking together from the caramel. Yum!
Now I'm thinking of all the other spices or maybe coffee powder to use instead of cinnamon. Imagine all the possibilities! More adventures for me!
Makes one huge bowl of finger sticking and licking popcorns
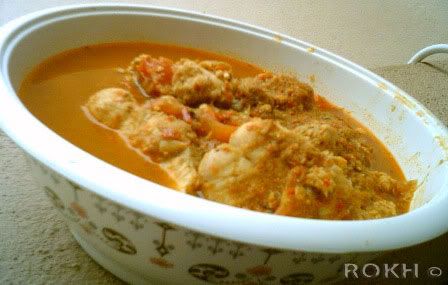
Ikan Assam (Spicy Fish in Tamarind)
Source: Female Appetite (Edition 1)
I did not have ginger flower and had omitted eggplants and lady’s fingers, adding more tomatoes instead, but I guess with those, it would had been much more flavourful and of course much more colourful. I ran out of lime thus added more tamarind for the sourness. I had also added 1 inch of Galangal (Lengkuas) just for fun, as I feel it would be appropriate, ah a cook’s whim.
4 tbsp oil
15g tamarind paste
500ml water
1 eggplant, julienned
1 tomato, cut in wedges
4 lady’s fingers
400g fish fillet
2 tbsp lime juice
Salt and sugar to taste
To grind:
30g dried prawns
20g shallots
30g onions
2cm belachan (shrimp paste)
20g dried chillies
20g red chillies
1 stalk lemongrass
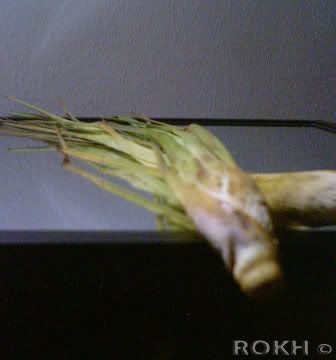
1 stalk ginger flower
Heat wok over high flame, add oil and lower the flame.
Sitr in grounded ingredients and tamarind paste until aroma arises
Add water and bring to boil
Reduce heat and add eggplant, tomato and lady’s fingers. Cook for about 10 minutes before adding the fish.
When fish is cooked, add lime juice, salt and sugar.
Serves 4 - 6 (depending on edacity of guests)
Note: This spicy dish tasted much much better overnight (we got plenty leftovers) and reheated, the complex flavours developed more and had taken it to a whole new level. So next time, I would cook it and leave it soaking at least few hours first before devouring.
Update: Check out the list of herbs for this week over at Kalyn's.

I had mentioned earlier that I would be baking a cake for her, which is non-dairy as Ah Ma could not stand butter or milk or cheese. Thus I decided to go on a quest to make a cake she would not only be able to tolerate; it would be one she would enjoy. After some tweaking, sweating and praying, yes I did, I had finally came up with a cake for Ah Ma:
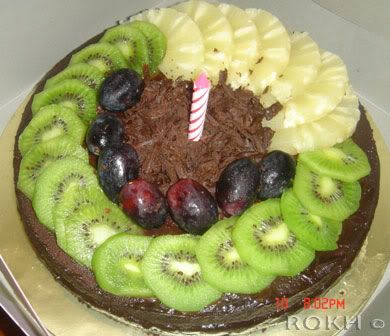
Chocolate Blueberry Cake with Chocolate Soy ‘Ganache’
A fellow cooking friend, C, from KC, recommended black forest Cake that she had just made. Looking at her delicious looking cake, I decided to give it a try. I saw the absence of butter but it called for whipping cream, which I’m sure, is a no no for Ah Ma. C had suggested non-dairy whipping cream but I’m not too keen as the look itself would still deter Ah Ma from trying it. Thus I tweaked the recipe a bit. Well actually a lot. I practically changed the whole thing and only used the basic chocolate cake. I had substituted black cherries with canned blueberries and forego the whipping cream altogether.
It was my first try at whipping the egg whites and I had troubled whipping it to stiff peaks. I was worried I might over whipped and thus ended up under whipped it. In the following recipe, I had added extra instructions in whipping the egg whites and how to incorporate the ingredients, a tip I learnt later from C. It was still bit runny but I gave up on it and use it anyway. This resulted in a disastrous not-fully-risen cake. To make matters worse, I had overlooked the recipe calling for 8-inch pan and had used a 9-inch one instead. Now you can imagine how short the cake it. Nonetheless, I persevered and sliced it anyway and sandwiched blueberries in between. I got a crack at the top of the cake, which C had also experienced and I had thought of a sly way to hide it. I sliced the cake into two, and put the cracked slice face down at the bottom instead and top with the other better looking slice. How would this affect the cake I’m not sure though, but if any of you do, please let me know. Anyhow, it solved the ugly part, but somehow it still lack the lustre of a cake fit to cater for a birthday bash.
After some head cracking, I had decided to do a ‘ganache’ for the cake. But of course, this would mean I need whipping cream again, thus I substituted and used soy milk instead and somehow came up with a spreadable cream which frosted the cake pretty well. Then back in Taiping, I rushed to the supermarket and got myself fruits to decorate the plain top. Should had gotten the strawberry instead as the canned pineapple was dull looking, much to my horror when I open it and I found that I overlooked that the dark purple grape would not stand out against the chocolate cake. Anyhow, my relatives were all very supportive, they said it looked wonderful and they ate it up with a resounding yum. I guess there were just being nice, as for me, I found the cake a bit tough, due to poorly risen, but other than that, it tasted great and no one realized the absence of dairy or the presence of soy. Even me. What a healthy alternative to a decadent looking and tasting cake.
Wet:
4 egg yolks
40g sugar
1/4 tsp salt
1 tbsp brandy
85ml corn oil warmed (I used EVOO)
25g cocoa powder
135ml warm water
Dry:
125g cake flour
1/2 tsp baking soda
1/2 tsp baking powder
4 egg whites
1/2 tsp cream of tartar
50g sugar
Filling:
1 can blueberries (bout 500g)
Ganache:
150g dark chocolate
4-6 tbps of Soy Milk
80g shaved dark chocolate(I did mine with a knife on a block of cooking chocolate)
Fresh fruits
For the base:
Mix the A well with a hand whisk
Next stir in cocoa powder into a warmed oil (I used the microwave) until dissolved and then pour into wet mixture.
Stir warm water into the mixture.
Next, sieve the dry ingredients and then stir into the wet mixture.
Whip egg whites in a mixing bowl until bubbles form. Add in the cream of tartar and whip until white. Then divide the sugar into 3 portions and add one at a time slowly into the egg white while whipping. Whip until stiff peak.
Pour some of the egg white into the mixture, incorporating it with a cutting movement of a spatula.
Pour in the rest of the egg white and mix till well blended.
Pour batter into a clean 8 inch baking pan.
Bake at 175C for 45 minutes or until the tester comes out clean.
Remove from pan and let cool on the rack.
Cut the cake into half.
For the ganache:
Put the dark chocolate and the soy milk in a microwave proof bowl and microwave on medium for about 4-5 minutes.
Then stir to incorporate.
Add chocolate if it’s too thin or add soy milk if it’s too thick and microwave a minute more. Stir.
Next spread out the blueberries on top of the bottom half of the cake slice.
Top up with the other cake slice.
Slowly spread the ganache onto the cake with a spatula.
Freeze till harden and then return to chill overnight.
Decorate with fruit slices as deem appropriate.(Strawberries would look good, and don’t get dark coloured fruits as it would drown on the dark cake, oh I nag like an Ah Ma)
Make a good 8 inch cake
(or a short 9 inch- which actually served more people, *laughed evilly)

I have talked bout these pandan leaves before where they were added into our kaya (local coconut jam) as additional flavouring. For me, pandan has the special fragrant smell that is not too strong but yet distinct enough to show its presence while not overpowering the entire dish.
Pandan leaves are a favourite in cooking together with rice like nasi lemak (coconut rice), nasi biryani or chicken rice (we locals here usually have our special Hainanese style oily rice cooked with chicken stock and pandan leaves to go with braised or roasted chicken). It will emit an extra fragrant aroma to the otherwise plain rice. Some people might not even realize its presence but will note how much more fragrant the rice is.
As for the sweets, we locals like to use it in ‘tong sui’ (sweet soup) and also in ‘kuih-muih’ (local cakes). Chinese had always been real good in tong sui making, we have huge varieties with different types of healing properties. I might blog more about it in future, featuring various tong sui that we usually have in Chinese cuisine, ah it can also be part of my ‘exploring my origins’ project.
Well for now, the limelight is on this week’s herb, pandan leaves. I have choices of so many favourites above, but somehow the alluring thoughts of tong sui evaded me and I succumbed to my old time favourite Hak Lor Mai (Sweet Black Glutinous Rice). My grandma use to make this only on occasions, and I would always be thrilled to have a bowful, then another helping, then another and another and...ok, too much! I just love the nutty flavours it emits (though no nuts here), and the crunch of the glutinous rice.
Usually, this Hak Lor Mai would be served with a drizzle of coconut milk, freshly squeezed and this is important as it will affect the flavour of the Hak Lor Mai. Some like a lot of coconut milk, some don’t, and I am one who loves my Hak Lor Mai black, just a little coconut milk plus whole load of pandan smell. Ah, bliss.
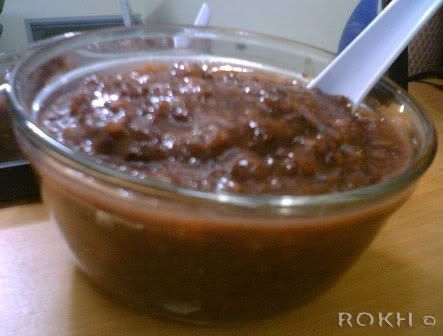
Hak Lor Mai (Sweet Black Glutinous Rice)
As now I am no longer in my teens where I can have a bowful and another and another without effect, I had become much more health conscious. Though delicious, coconut milk is not good to be consumed in excess. Therefore, I had substituted it with evaporated milk, and I personally like it much more. Though, this is strictly individual preferences, and most would gaps at this un-authenticity. Anyhow, J seems to prefer the evaporated milk version too, oh that vain boy!
300g Black Glutinous Rice
2 litres of water
4 pcs Pandan leaves
250g Gula Melaka (Palm sugar)
150 ml coconut milk/evaporated milk
Dump everything, except the gula melaka and coconute milk, into the slow cooker and put on auto/low for about 8 hours or overnight.
Next, add in gula melaka and cook till dissolved, bout 15-20 minutes more.
Serve a bowful of Hak Lor Mai with a drizzle of coconut milk or like me, evaporated milk.
This yummy tong sui goes well served warm or chilled.

Alternative method from KC:
Soak rice overnight.
Drain and wash rice the next day.
Put rice into rice cooker to cook.
Add enough water to cook the rice.
When rice is cooked, removed.
Boil water with gula melaka, pandan leaves till sugar is melted.
Add cooked rice to it and simmer over low heat for 2 hours.
Add more water if it dries up.
Served as suggested.
Makes for a person who can finish a bowl, then reach for another, and another, and another and….till the sixth bowl, if still possible ;) To be safe, share these quickly!
Update: Get all those herbs over at Kalyn's Kitchen
“Often overlooked is the lake gardens' history. It is said to be the oldest lake gardens in Malaysia, opened to the public in 1880”
Oh no! I did not mean to burn my new beloved blog. It’s young, barely growing and I’m killing it! No, it’s just that I’m joining in a one off event, thought up by Rachael at Fresh Approach Cooking, to let the world know how bad a photographer I am. But I guess you already know that judging from my previous pictures. Nevertheless, lets pretend those are not as bad to be in this entry.
The following not-so-kind-to-the-eyes-or-appetite picture will be featuring one of the food that I whipped up in the kitchen on spur of the moment and from inspirations and ideas I mixed and matched from everywhere. This particular one is about the current crave of Hong Kong food mania in Malaysia. You can see how greatly these Hong Kong ‘Char Chan Teng’, which is kinda like bistro ala HK style, had stormed Malaysia. It is really popular in HK and now it had spread over to our side, with adaptation of course. Recently, Babe in KL had just featured them, there are also few more outlets reviewed by Swee San from JustHeavenly and also at Yummy Corner.
As for me, I had only managed to try out and frequented two of the popular ones in Petaling Jaya area which is Kim Gary (both outlets in Midvalley, yeah I know that’s in KL but it is real close to PJ and I considered it in ‘my area’ too and also The Curve, ah, this is definitely superbly near as my condominium is right opposite it) and also Wong Kok Char Chan Teng (both One Utama and the outlet in SS2). If you’re not from Malaysia, PJ is an urban outskirt next to the famous KL town, where it’s younger in development. You can get more information on this wonderful town that I stayed in over at Wikitravel. If you do go over and read, I so happened to live in the northern “chunk” Damansara, as mentioned in there. Anyway, these restaurants are famous for the milk tea and also my all time favourite “Yin Yong” which is actually coffee and tea with milk, plus of course, the cheese baked rice. It is basically rice, with either chicken chop or fish fillet, topped with either tomato or sweet cream corn sauce and baked with cheese sprinkled on the top. Therefore, it is a basically a really simple dish to whip up with whatever you have in the refrigerator.
Alright, I have slide way out of topic. As I mentioned, this is a burning-my-blog event to disgust my reader. As after I came up with my concoction, which was on the spur to feed a hungry guy who just woke up from a deep sleep, I promptly serve him on the newspaper he was reading (if you look closely it is in the background) and had a quick snap with my poor quality digital camera plus bad lighting from my dining area, you get the idea how this is going to turn out. Well, I did not fuss to take a better picture when I saw my dear boy with a spoon on one hand and a fork on the other, looking wild eyed at the food with saliva dripping from his mouth (alright I might be exaggerating a little, ok, maybe a lot), and so I chuck the PDA away and let him dig into the food.
Well, so here goes to the ugliest food picture I have ever taken but yet given thumbs-up by a hungry guy (well, when you’re hungry, your thumb is bound to come up eh), but trust me, I tasted it and it can well fight those out there, except maybe a tad too sweet. (I’m such a food critic, *roll eyes).

My Version of Cheese Baked Rice with Chicken Fillet and Omelette in Tomato Pineapple Sauce
Phew, what a name. Anyway, here goes a really rough ‘guesstimation’ of my concoction as I just cooked it on a whim. Try it out at your own risk. But I believe you cannot go wrong with these as it is perfectly adaptable in anyway.
A palm size chicken fillet (chopped into pieces)
2 eggs (beaten)
Dash of soy sauce
Dash of fish sauce
Dash of Chinese Rice Wine
1 medium onion (chopped)
1 tomato (chopped)
Bout 3tbsp of tomato sauce
2 tbsp of pineapple juice (leftover from my pineapple tarts)
Olive oil
2 cups of cooked rice
1/4 cup of shredded mature cheddar cheese (or any cheese you prefer)
First, marinate the chicken fillets with soy sauce and fish sauce for about 10 minutes.
Then heat up non-stick pan with some olive oil.
Put in the marinated chicken fillets and pan fried still seared on the outside but still tender inside, it will further cook more when you bake it.
When it is nearly done, give a few good dash of Chinese rice wine for good flavour. Trust me, this is important.
Add another dash of OO, and fried your omelette with another good dash of soy sauce. Remove from pan.
Next, reuse the pan, if it is oily still, you do not need to add oil, if it is dry do so, and put in the onion. Sauté if for sometime till it is soft and a little caramelize.
Then stir in tomatoes and cook for another minute.
Add in tomato sauce and pineapple juice. Adjust to taste.
To assemble, simply scoop rice into whatever pan that is right, I do not have so I had used the bread pan instead (oh such shame), lined with foil.
Then spread half the fried chicken fillets over the rice, top with half the sauce.
Spread out remaining chicken fillets and top with the omelette.
Drown the top with remaining sauce and sprinkled with shredded cheese.
Bake in preheated oven at 250 degrees until the cheese is bubbly, melted and slightly browned here and there.
Serve 1 really hungry guy
Update: Thought my picture had ruined your upcoming meal? Think again and head on to Fresh Aprroach Cooking for more to "unwet" your appetite!
